4-3-3 Set paper format
When creating a new form definition, set the paper format before starting work.
Change the paper properties in the Property Editor on the Form Editor.
The properties for paper can be displayed when all items are deselected.
To deselect items, click an area on the Form Editor where there are no items, or click the  Deselect button on the toolbar.
Reference
If you are creating an item, click the  Item selection mode button on the toolbar or press ESC to change the pointer to Item selection mode and deselect the item.
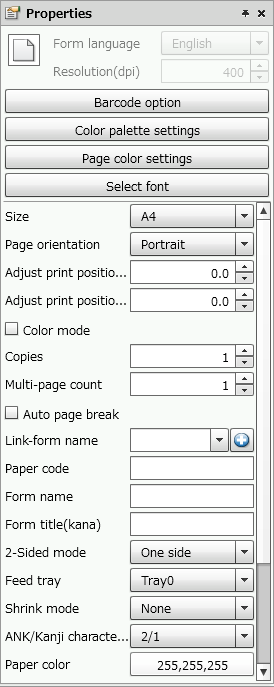
Set the paper with the Property editor
Set the following properties with the Property editor:
Item | Description | ||||||||||||||||||||||||||||||||
|---|---|---|---|---|---|---|---|---|---|---|---|---|---|---|---|---|---|---|---|---|---|---|---|---|---|---|---|---|---|---|---|---|---|
Form language | Shows the language used in form design. Specify this setting when creating a new form definition. | ||||||||||||||||||||||||||||||||
Resolution(dpi) | Shows the resolution of the form to be designed. Specify this setting when creating a new form definition. | ||||||||||||||||||||||||||||||||
Barcode option | Depending on the printing environment, if the barcode accuracy decreases, use the Barcode option to correct the Density, Element size, and toner blur of barcode. ReferenceFor details of barcode settings, see "Set barcode correction" in "4-6-3 Create output area for barcodes". | ||||||||||||||||||||||||||||||||
Color palette settings | Set the color that is the basis of the design color and print color in Color palette settings. ReferenceFor details on color palettes, see "4-11-2 Set a color palette". | ||||||||||||||||||||||||||||||||
Page color settings | Set default print colors for multi-pages. ReferenceFor details on page colors, see "4-11-4 Set the Page color". | ||||||||||||||||||||||||||||||||
Select font | Select a font to use for the form definition. ReferenceFor details of font selection, see "Font selection". | ||||||||||||||||||||||||||||||||
Size | Specify the paper size to be used. Selectable Paper size is as follows: "Postcard", "A5", "A4", "A3", "B5", "B4", "Letter", "Stock form", "User-defined"
CautionThe printable area displayed on the Form Editor is a guide. Print the pages to confirm the actual printable area. Reference
| ||||||||||||||||||||||||||||||||
Paper orientation | Select Portrait or Landscape as page orientation.
| ||||||||||||||||||||||||||||||||
Stock form height(1/6inch) | Specify the height of Stock form in 1/6 inch units. You can also change the value by clicking the
ReferenceWhen designing a form for output with a dot printer, by specifying the vertical size of Stock form to be a multiple of 3, you can prevent page breaks. In the case of irregular paper sizes, design multiple pages to fit in one form. Example: When one page of data is a 22/6 inch form The paper size, 22/6 or about 3.7 inches, is an irregular paper size. For such paper, calculate the vertical size of the paper so that it is a multiple of 3, and design printing for multiple pages as one form. Since 22*3=66, specify 66/6 inches as the height of the stock form. When designing the form, design the data of three pages onto one form. | ||||||||||||||||||||||||||||||||
Stock form width(inch) | Specify the horizontal width of Stock form in 1 inch units. You can also change the value by clicking the
| ||||||||||||||||||||||||||||||||
User-defined paper height(mm) | Specify the height of the user-defined paper in millimeters. You can also change the value by clicking the ReferenceAs there are some limitations depending on the printer, for details, see "SVF for Java Print User's Manual" and "SVF for PDF User's Manual". | ||||||||||||||||||||||||||||||||
User-defined paper width(mm) | Set the width of user-defined paper in millimeters. You can also change the value by clicking the ReferenceAs there are some limitations depending on the printer, for details, see "SVF for Java Print User's Manual" and "SVF for PDF User's Manual". | ||||||||||||||||||||||||||||||||
Adjust print position (X)(mm) | Moves the print position horizontally by the specified value. You can also change the value by clicking the
| ||||||||||||||||||||||||||||||||
Adjust print position (Y)(mm) | Moves the print position vertically by the specified value. You can also change the value by clicking the
| ||||||||||||||||||||||||||||||||
Color mode | If you select this check box, each item will be printed according to its specified print color. If you clear this check box, each item will be printed in monochrome, even if a print color has been set. | ||||||||||||||||||||||||||||||||
Copies | Specify the number of copies to print. You can also change the value by clicking the
| ||||||||||||||||||||||||||||||||
Multiple-page count | Specify the number of sheets that make up a set of forms within the range of 1 to 30. You can also change the value by clicking the
| ||||||||||||||||||||||||||||||||
Auto page break | Specify whether to insert a page break when a form containing a repeat item is printed, with the VrSetForm function set to Random mode (setting value 1) in the program, and the row count exceeds the number of rows set for the repeat item. If you select this check box, a page break is inserted automatically, and the excess row data is output on the next page. If you clear this check box, row data exceeding the page is ignored. Reference
| ||||||||||||||||||||||||||||||||
Link-form name | When Auto page break is selected, and a form containing a repeat item is output in Random mode or Report-writer mode, specify the form that is used after the page break. If Link-form name is not specified, the excess data is output to the same form as the first page. To select a form definition or XML form file that was selected as a link-form into the form definition, specify it from the Link-form name list. If the link form to be set in the list is not displayed, click the CautionThe XML form file specified as a link-form will not be output correctly if it does not contain the same field names, subform names and record names as in the original XML form file. | ||||||||||||||||||||||||||||||||
Paper code | Type a paper code. When you use Report Director Enterprise, paper code is used as key information for displaying the "Paper changed message" when outputting to a dot matrix printer. If the paper code changes, the "Paper changed" message appears. | ||||||||||||||||||||||||||||||||
Form name | Type a form name. Input is optional. | ||||||||||||||||||||||||||||||||
Form title(kana) | Type a form name in kana characters. Input is optional. | ||||||||||||||||||||||||||||||||
2-Sided mode | Select 1-sided or 2-sided printing. In case of 2-sided printing, select its bind direction. You can also specify this option by using the VrSetDuplex function when printing. ReferenceFor details of the VrSetDuplex function, see "SVF Java PRODUCTS API Reference Manual". | ||||||||||||||||||||||||||||||||
2-Sided margin(mm) | Select margin of 2-sided printing. You can also specify this option by using the VrSetDuplex function when printing. ReferenceFor details of the VrSetDuplex function, see "SVF Java PRODUCTS API Reference Manual". | ||||||||||||||||||||||||||||||||
Feed tray | Outputs from the specified tray when printing. The printer tray to which this number corresponds is defined in SVF Configuration Tool. The settings differ according to the printer. You can also specify this option by using the VrSetTray function when printing using SVF output engine. RestrictionThe printer displays an error if the paper size of the specified tray is different from the size of paper to be output. Reference
| ||||||||||||||||||||||||||||||||
Shrink mode | When printing, the output is enlarged/reduced to the size of the specified shrink mode. ReferenceEven if Conform to the form (with printer function) is specified for Scaling mode in the output printer property on SVF Configuration Tool, the size specified in Shrink mode may not be available. For details of output printers by model, see "SVF for Java Print User's Manual". | ||||||||||||||||||||||||||||||||
ANK/Kanji character ratio | Specify the ratio of character spacing (character width + character pitch) for half-width and full-width characters. It is not reflected on the SVF Cloud Designer screen and is applied only when printing. ReferenceThis is only supported in Basic mode. For details of supported printer models, see "SVF for Java Print User's Manual" or "SVF for PDF User's Manual". If "3/2" is specified, the Ank3/2 Kanji settings in SVF Configuration Tool are used. | ||||||||||||||||||||||||||||||||
Paper color | Select the display color of the paper in the Form Editor.
| ||||||||||||||||||||||||||||||||
PDF layer | Specify whether to output PDF layer to a PDF file. ReferencePDF layer is a layer feature added from Adobe Reader 6.0. | ||||||||||||||||||||||||||||||||
Paper type | Outputs on the specified paper type when printing. The paper type specified here is defined in SVF Configuration Tool. The settings differ according to the printer. ReferenceFor details of the correspondence for each printer, see "SVF for Java Print User's Manual". | ||||||||||||||||||||||||||||||||
Use the numeric data editing symbols from SVF output engine (supports Service Pack 2) | Specify whether to use the default symbols for editing numeric data per language of form files (SVF locale).
The default value per language of form files (SVF locale) are as follows:
CautionIf you use an XML form file with the Use the numeric data editing symbols from SVF output engine check box cleared in the SP1 environment or in an environment without the service pack applied, the following operations occur:
| ||||||||||||||||||||||||||||||||
Currency symbol (supports Service Pack 2) | Specify a currency symbol used when executing SVF. The specified symbol will be reflected in the drop-down list of Additional display symbols in the following settings:
| ||||||||||||||||||||||||||||||||
Decimal marker (supports Service Pack 2) | Specify a decimal marker used when executing SVF. The specified symbol will be reflected in the decimal marker in the following settings:
| ||||||||||||||||||||||||||||||||
Thousands separator (supports Service Pack 2) | Specify a thousands separator used when executing SVF. The specified symbol will be reflected in the thousands separator in the following settings when you set "On" in 1000 separator:
|


Select font
In Font selection, edit the font list that can be selected from Full-width font and Half-width font in the property editor. Full-width font and Half-width font are properties of items that can display characters such as fields and static characters.
Reference
You can set Select font for each form definition.

"Select font" dialog
Item | Description |
|---|---|
Full-width tab / Half-width tab | Switch the font name to display in the list to full-width fonts or half-width fonts. Fonts listed here can be selected in the Property editor for field, static text and other items that can display characters. |
Add button | Click to display the Full-width font list dialog or the Half-width font list dialog, and list the fonts set by the administrator. Select a font and click the OK button to add to the list box. 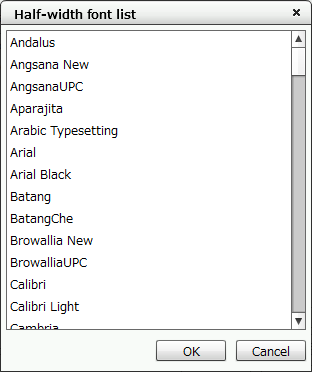 "Full-width font list" dialog |
Delete button | Select a font name from the list and click the Delete button to delete the selected font from the list. ReferenceDefault fonts cannot be deleted. |