4-7-4 Draw callouts
This section describes the procedure for placing callouts as well as the property items of callouts.
There are three types of callouts: rectangle, elliptical, and cloud. You can input strings for each callout. The properties are almost the same for each callout.


Procedure for drawing callouts
Use the following procedure to draw callouts:
Click the button for creating the desired callout on the toolbox and move the pointer to the Form Editor.
The pointer changes to
 .
.Drag the mouse as if you were drawing a square on the Form Editor.
A callout is then drawn.
Set the properties for the placed callout with the Properties Editor.
Callout properties
The properties of rectangle, elliptical and cloud are almost the same.
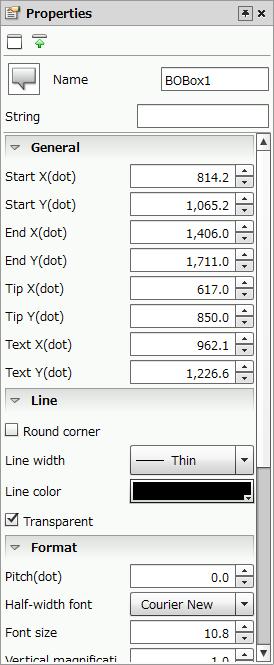
Rectangular callout properties
Common settings
Item | Description |
|---|---|
Name | Type a name. You can use alphanumeric characters, Kana, Kanji, and underscores (_). The name can be up to 30 bytes in length. Do not use a number for the first character of the name. By default, the name is automatically set as a sequential number following the various shape names as follows:
|
String | Type the string to be displayed. You can type up to 1,000 characters at a time. A surrogate pair character is counted as two characters. RestrictionUnicode IVS (variation characters) is not supported for strings in callouts. |
General
Item | Description |
|---|---|
Start X(dot) | Set the X coordinate of the upper left corner of the callout. You can also change the value by clicking the |
Start Y(dot) | Set the Y coordinate of the upper left corner of the callout. You can also change the value by clicking the |
End X(dot) | Set the X coordinate of the lower right corner of the callout. You can also change the value by clicking the |
End Y(dot) | Set the Y coordinate of the lower right corner of the callout. You can also change the value by clicking the |
Tip X(dot) | Set the X coordinate of the tip of the callout. You can also change the value by clicking the |
Tip Y(dot) | Set the Y coordinate of the tip of the callout. You can also change the value by clicking the |
Text X(dot) | Set the X coordinate of the text input start position. You can also change the value by clicking the |
Text Y(dot) | Set the Y coordinate of the text input start position. You can also change the value by clicking the |
Attribute-formula | Specify an attribute-formula. For details on attribute-formula, see "6-3-1 Set attribute-formula". |

Line
Round corner (only for rectangular callouts) | Specify whether to make the corners round. Select the check box to make the corners round. |
Corner size (dot) (only for rectangular callouts) | Specify the radius of round corners if you have selected Round corner. |
Line width | Select the line width. If you select Free(dot), you can freely set the line width in Line width(dot). |
Line width(dot) | Set the line width in dots if you have selected Free(dot) in Line width. RestrictionWhen the line is longer than 30,000 pixels, the line width may not be displayed correctly. |
Line color | Specify the color of the line. |
Transparent | Specify whether to make the area inside the callout frame transparent or fill it with a color. If you select the check box, the area inside the star frame will be transparent and you can see items and shapes under the star through it. |
Fill color | When Transparent is cleared, you can specify a fill color. |
Format
Item | Description |
|---|---|
Pitch(dot) | Specify the character pitch. You can also change the value by clicking the |
Full-width font | Select a font used to print full-width characters. For details of selectable fonts, see "Reference" in "4-4 Overview of items". |
Half-width font | Select a font used to print half-width characters. For details of selectable fonts, see "Reference" in "4-4 Overview of items". ReferenceWhen "None" is selected, the font specified as the full-width font is also used as the half-width font. |
Font size | Specify the size of fonts to print in units of points. You can specify the font size within the range of 1 to 96 points. You can also change the value by clicking the |
Vertical magnification | Specify the ratio of character height. By specifying a height ratio, narrow characters that cannot be specified by points can be printed. You can also change the value by clicking the |
Horizontal magnification | Specify the ratio of character width. By specifying a width ratio, wide characters that cannot be specified by points can be printed. You can also change the value by clicking the |
Bold | Select the check box to output characters in bold. |
Italic | Select the check box to output characters in italics. |
Outline | Select the check box to outline output characters. |
Outline width(dot) | When the Outline check box is selected, specify the line width for outline in dots. |
Mask/Image | When the Outline check box is selected, specify an image to output in the area enclosed by the outline. |
White-letter | Select the check box to output characters in white. |
Shadow | Select the check box to output characters with shadows. RestrictionDepending on the printer, there may be cases where the specified character decoration will not be output. |
Gradation | Specify whether to apply gradation to the color of the text output in the callout. Select the check box to apply gradation to the text color. |
Gradation start color | Specify the start color of the gradation. |
Gradation end color | Specify the end color of the gradation. |
Gradation type | Specify the direction of the gradation from the start point to the end point. The gradation changes depending on the start color, the end color, and the type settings as follows: 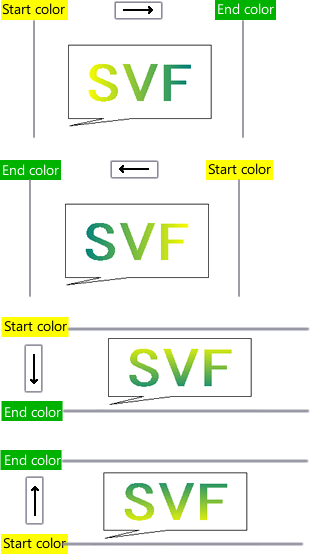 Rectangular callout properties |
Text color | If Gradation is not selected, specify the text color of a callout. |
Multi-page
Multi-page is the same as polyline and polygon settings. For details, see "Multi-page" in "Polyline/Polygon properties" in "4-7-2 Draw basic shapes".