4-6-11 Output text strings not in data (Static text)
Character strings that are not included in the data, such as the title of the form, company name, address, and telephone number, but are printed are called fixed characters.
If you use the same XML form file to output data, the static text items placed on the forms are output onto all forms.
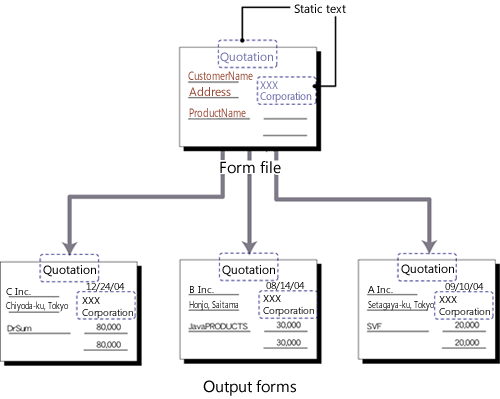
Static text is output on all printed forms
Static text is always a single line, and set text decoration and other properties for each static text item.
Restriction
Static text does not support Unicode IVS (variant character).
Place static text
Use the following procedure to place static text:
Click the
 Create static text button on the toolbox and move the pointer to any point on the Form Editor.
The pointer changes to
 .
.Click the mouse on the Form Editor, input any character string in the String dialog, and press ENTER.

Enter a string in the "String" dialog
Set the properties for the placed static text with the Property editor.
Set the static text properties
Set the static text properties. Properties are categorized as General, Format, Multi-page.
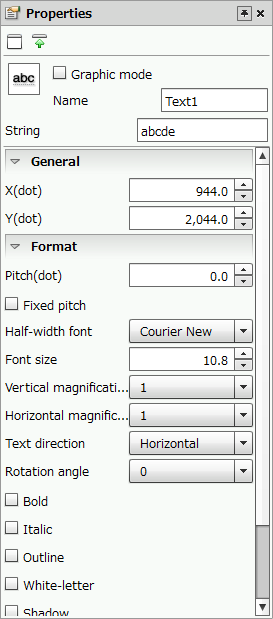
Static text properties
Reference
In the color specification field, you can select the color registered in Color palette settings in the paper Property editor. For details on how to set color palettes, see "4-11-2 Set a color palette".
Common settings
Item | Description |
|---|---|
Graphic mode | Specify whether to enable the graphic features. When the check box is selected, the graphic features are enabled. The Graphic mode items are added to the Property editor and you can make advanced settings. For details on the graphic mode, see "4-2 Basic mode and graphic mode". |
Name | Type a static text name. If a name is not specified, it is automatically and sequentially specified from "Text1". The name can be up to 30 bytes in length. You can use alphanumeric characters, Kana, Kanji, and underscores (_). Do not use a number for the first character of the name. |
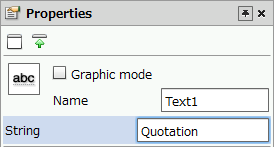
String | Type the string to be displayed. You can type up to 1,000 characters at a time. A surrogate pair character is counted as two characters. |
General
Item | Description |
|---|---|
X(dot) | Specify the X coordinate of the upper left corner of the static text. For vertical writing, the X coordinate represents the upper right corner in graphic mode and the upper left corner in basic mode. You can also change the value by clicking the |
Y(dot) | Specify the Y coordinate of the upper left corner of the static text. For vertical writing, the Y coordinate represents the upper right corner in the graphic mode and the upper left corner in the basic mode. You can also change the value by clicking the |
Attribute-formula | Specify an attribute-formula. For details on attribute-formula, see "6-3-1 Set attribute-formula". |

Format
Item | Description |
|---|---|
Pitch(dot) | Specify the character pitch in dots. You can also change the value by clicking the |
Fixed pitch | Usually, all characters are output on a character-by-character basis. However, if this check box is selected, characters are output as a string under some conditions (Some models do not support this function). This operation is available for the SATO global model, the Zebra model, or certain printer models that have a maximum limit on the number of characters that can be output. You may be able to use the printer-specific features by selecting this check box. However, in some cases, characters may not be output at the correct positions. |
Full-width font | Select a font used to print full-width characters. For details of selectable fonts, see "Reference" in "4-4 Overview of items". |
Half-width font | Select a font used to print half-width characters. For details of selectable fonts, see "Reference" in "4-4 Overview of items". ReferenceWhen None is selected, the font specified as Full-width font is also used as the half-width font. |
Font size | Specify the size of fonts to be printed in points. You can specify the font size within the range of 1 to 96 points. You can also change the value by clicking the |
Vertical magnification, Horizontal magnification | Specify the height and width ratio of characters. In the basic mode, you can only specify the magnification from 0.5, 1, 2, 3, 4, 6, or 8. RestrictionThere are restrictions on the combinations of magnifications supported by the model. |
Text direction | Select the output direction of the string from Vertical or Horizontal. |
Rotation angle |
|
Bold | Select the check box to output the characters in bold. |
Italic | Select the check box to output the characters in italic. |
Outline | Select the check box to outline output characters. |
Outline width(dot) (Only in graphic mode) | When the Outline check box is selected, specify the line width for outline in dots. |
Mask/Image (Only in graphic mode) | When the Outline check box is selected, specify an image to output in the area enclosed by the outline. |
White-letter | Select the check box to output characters in white. |
Shadow | Select the check box to output shaded characters. RestrictionDepending on the printer, there may be cases where the specified character decoration will not be output. |
Gradation (Only in graphic mode) | Select the check box to output text in a gradation of colors. |
Gradation start color | When Gradation is selected, specify the gradation start color. |
Gradation end color | When Gradation is selected, specify the gradation end color. |
Gradation type | When Gradation is selected, specify the direction of gradation from the start point to the end point. The gradation changes depending on the start color, the end color, and the type settings as follows: 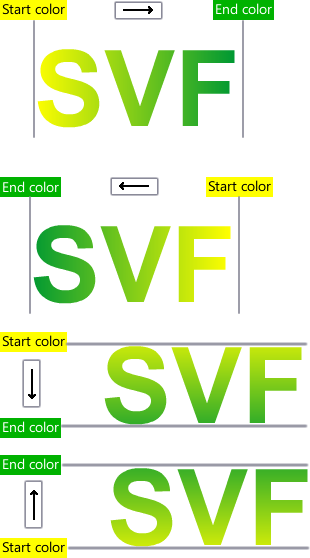 |

Multi-page
Multi-page settings are the same as those for fields. For details, see "Set the field properties" in "4-6-1 Create output area (fields) for text and numeric values".
Change the string
Use the following procedure to change the string of a static text:
Select a static text.
Press F2. When the String dialog appears, change a string and press ENTER.
Change a string in the "String" dialog
Reference
Service Pack 1 supports changing the character string by pressing the F2.
You can also select a static text and change in String in the Property editor.
Change "String" in the Property editor
Rotate a static text
You can rotate a static text in any direction.
Restriction
Static text cannot be rotated if the graphic mode is not selected.
Select a static text item and move the mouse cursor near the handle
 displayed on the right side of the static text (on the lower right of the static text for vertical writing).
The pointer changes to
.Drag the mouse in the desired direction referencing the guidelines and angle.
The static text is rotated.

Static text rotated in the dragging direction
Reference
The rotation angle can also be specified from Rotation angle in the Property editor.
Enlarge or reduce the static text
You can change the size of static text by enlarging or reducing the static text.
You can also change the pitch.
Select the static text item and move the pointer near one of the square handles displayed around the static text.
The pointer changes to
 .
.Drag the mouse in the desired direction referencing the guidelines.
The static text is enlarged or reduced.
The size of the static text is changed, but the aspect ratio of the text is not changed.
Thus, when you drag the mouse in a vertical direction, the width of the text is automatically changed accordingly.
When you drag the mouse in a horizontal direction, the pitch is changed with the text size unchanged.
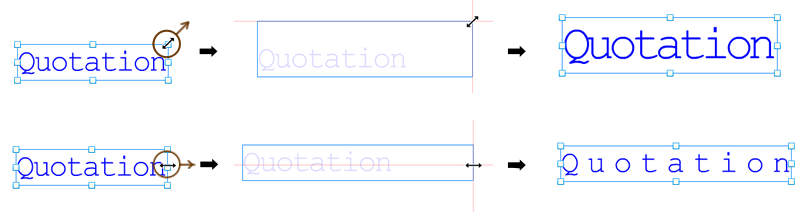
Enlarge the text size with the aspect ratio unchanged (top) and drag in a horizontal direction to change the pitch (bottom)
Reference
The font size can also be specified in Font size in properties.
You can also specify the pitch adjustment in Pitch(dot) in the properties.
Concatenate static texts
You can concatenate multiple static texts. This feature is supported by Service Pack 1.
For details, see "Concatenate static texts" in "4-5-5 Convert item types".