4-6-1 Create output area (fields) for text and numeric values
"Field" is an area for outputting data such as text strings and numeric values passed on from the application. Fields usually output different contents for each form, such as date, customer, address, product name, etc., depending on the contents of the data.
Fields are classified into two types depending on the output data: Text field and Numeric value field.
Instead of outputting data to a field, you can also set a calculation-formula or edit-formula to output a value to the form. For numeric data, you can also set display editing such as comma delimiter.
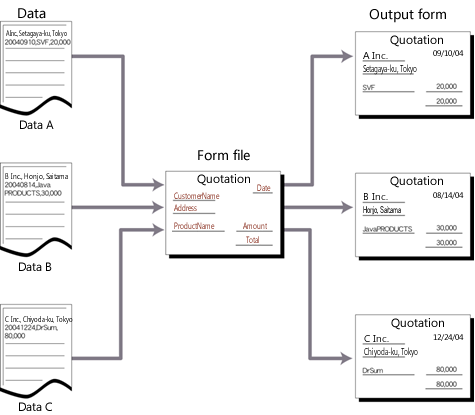
The contents output to the field differ depending on the data
Place a field
Use the following procedure to create fields:
Click the
 Create field button on the toolbox and move the pointer to the Form Editor.
The pointer changes to
 .
.Drag the mouse on the Form Editor.
The length is displayed in the upper left part of the field to be placed. Drag it to any length.
The field is placed.
Drag the mouse to any length
Set each item of placed field properties on the Property editor.
Set the field properties
Set the properties on the Property editor. Field properties are grouped into the General, Extended settings, Format, Report-writer, and Multi-page.

Field properties
Reference
In the color specification field, you can select the color registered in Color palette settings in the paper Property editor. For details on how to set color palettes, see "4-11-2 Set a color palette".
Common settings
Item | Description |
|---|---|
Graphic mode | Specify whether to enable the graphic features. When the check box is selected, the graphic features are enabled. The Graphic mode items are added to the Property editor and you can make advanced settings. For details on the graphic mode, see "4-2 Basic mode and graphic mode". |
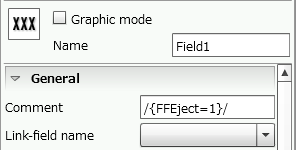
Name | Type a field name. If you do not specify a field name, it is specified from "Field1" sequentially. You can use alphanumeric characters, Kana, Kanji, and underscores (_). The name can be up to 30 bytes in length. Do not use a number for the first character of a field name. |
General
Item | Description |
|---|---|
Comment | Type comments for the field. Though comments are not used when printing, if you set the meaning of the field to comment, form maintenance will be easier. Also, you can set the FFEject feature by entering "/{FFEject=1}/" in comment. For details of FFEject, see "FFEject". |
Link-field name | Specify a link-field name. The link-field is a field that takes over the excess data and prints it when data that exceeds the number of printable digits in this field is received. If you do not specify a link-field, excess data will be cut. For a field created within a record, you can specify the name of the field itself in Link-field name to enable auto-break. Such fields are called "auto link-fields". Also, you can separate the data to be output to a field with any character (delimiter) and output the rest of the data to a linked field. In this case, the link field must be configured in SVF Cloud Manager. For details, see "SVF Cloud Administration Guide". Reference
CautionTo use link field, the link source, the link field and output data must be of the same data type. RestrictionIf you output a form in Thai, a line feed using a link field does not consider a combination of consonants, vowels, and tone marks. |
X(dot) | Specify the X coordinate of the upper left corner of the field. For a vertical writing field, the X coordinate represents the upper right corner in graphic mode and the upper left corner in basic mode. You can also change the value by clicking the |
Y(dot) | Specify the Y coordinate of the upper left corner of the field. For a vertical writing field, the Y coordinate represents the upper right corner. You can also change the value by clicking the |
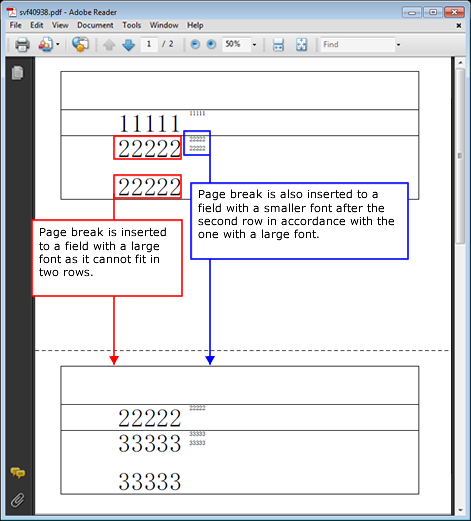
Number of digits (print) | Specify the number of characters to be printed in digits, counting half-width characters as 1 digit and full-width characters as 2 digits. Whether full-width or half-width is determined based on the SVF-specific specification. If you use the FORMAT function in the edit-formula to output data with a decimal point, commas, or additional symbols, you need to specify the total number of digits including those characters. You can also change the value by clicking the ReferenceYou can change the number of digits by dragging the white square handle displayed at the right and left ends of the field (the upper and lower ends for a vertical writing field) when you select the field. CautionIn numeric fields, all digits are filled with asterisks (*) when the input data exceeds the number of digits specified for the fields. |
Number of digits (data) | Specify the size of the data buffer for the field in digits, counting half-width characters as 1 digit and full-width characters as 2 digits. Whether full-width or half-width is determined based on the SVF-specific specification. Specify this when you want to retain data that is larger than the number of print digits in order to process a calculation-formula and/or edit-formula. If "0" is specified, it is regarded as the same value as the number of print digits. You can also change the value by clicking the When the field is set as an auto link-field, the value set here is considered the upper limit for auto-break. If the number of print digits is set to 20 and the number of data digits is set to 100, up to five rows are output with line-feed. |
Field type | Specify whether the data to be input in the field is half-width or full-width. This setting is specified in order to see easily in the Form Editor whether the data to be set in the field uses half-width or full-width. This feature does not convert full-width into half-width characters or vice versa when printing them. Even if you specify half-width, full-width characters are output without problems. |
Rotation angle | Specify the rotation angle to rotate the string. In basic mode, you can specify 0, 90, 180 or 270, and in graphic mode, you can specify any value between -360 and 360. The string is rotated counterclockwise when you specify a positive value and clockwise when you specify a negative value. Horizontal writing fields are rotated around the upper left corner coordinate. Vertical writing fields are rotated around the upper right corner coordinate. In graphic mode, you can rotate the item using the handles. For details, see "Rotate fields" in this section. RestrictionIf Form language is Thai, this item is not displayed in the basic mode and its value is 0. |
Mask | For an item placed on multi-pages, you can select this check box so that the field data is not printed. Set this option for items such as dummy fields used only as key-breaks (used only for data processing without printing). When the check box is selected, the field is masked (the data is not printed). When the check box is cleared, the field is not masked (the data is printed). |
Data type | Specify whether the data output in the field is processed as numerical value or as text. ReferenceThe initial value of data saved in the field buffer depends on whether the field data type is Text type or Numeric value type.
|
Edit style | Select the alignment style of the field when it is printed.
|
Calculation-formula | You can set the edit functions provided in SVF, such as basic arithmetic operations or field references. Click the 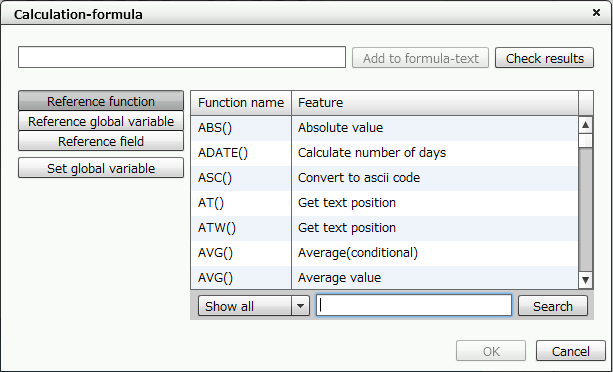 "Calculation-formula" dialog For details on how to set the calculation formula, see "5-1 Basics of calculation-formulas and edit-formulas". |
Edit-formula | You can use editing functions and system variables provided by SVF, and set the data output format using the FORMAT function. Click the 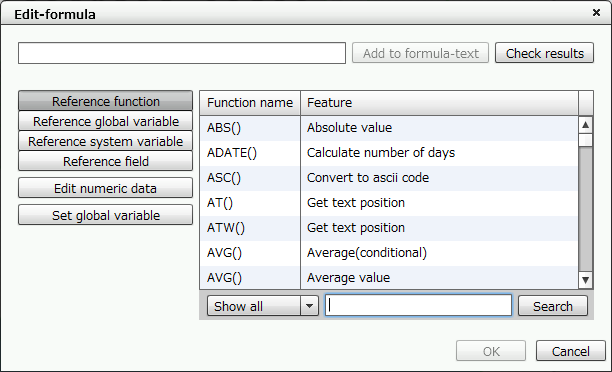 "Edit-formula" dialog For details on how to set the edit formula, see "5-1 Basics of calculation-formulas and edit-formulas". ReferenceThe buffer values of fields specified in calculation-formulas or edit-formulas vary as follows:
|
Attribute-formula | For an item placed on multi-pages, you can set display attributes, such as whether to show or hide it and text colors, by specifying with functions. The Add attribute formula dialog appears when you click the 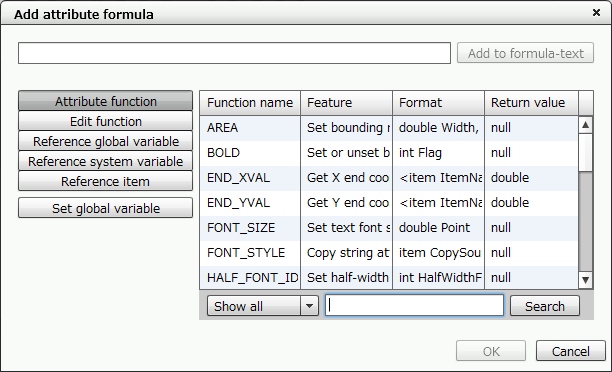 "Add attribute formula" dialog For details on how to set the attribute formula, see "6-3-1 Set attribute-formula". |

Extended settings
Item | Description |
|---|---|
Use as search field (supports Service Pack 2) | Specify whether to use as a search field in the cloud version of invoiceAgent Documents (hereafter referred to as iA Documents). When you select the check box, the search field information is added to PDF files that are output with SVF for PDF. The assigned information is used as search conditions and sorting conditions in iA Documents. For details, see the product manuals for iA Documents. Caution
|
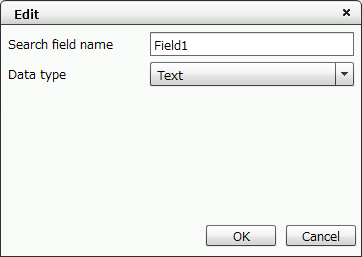
Search field (supports Service Pack 2) | If you select the Use as search field check box, specify a search field name. The setting items vary depending on the settings of Data type and Graphic mode. The initial value is set to the same name as the field Name. You can use alphanumeric characters, Kana, Kanji, and underscores (_). The name can be up to 30 bytes in length. Do not use a number for the first character of a search field name.
|
Format
Item | Description |
|---|---|
Pitch(dot) | Specify the character pitch. This is the character pitch in half-width. For full-width characters, the pitch will be double the specified value. You can also change the value by clicking the RestrictionIf Form language is Thai, this item is not displayed and its value is set to 0. |
Fixed pitch | Usually, all characters are output on a character-by-character basis. However, if this check box is selected, characters are output as a string under some conditions (Some models do not support this function). This operation is available for the SATO global model, the Zebra model, or certain printer models that have a maximum limit on the number of characters that can be output. You may be able to use the printer-specific features by selecting this check box. However, in some cases, characters may not be output at the correct positions. RestrictionIf Form language is set to Thai, this item does not appear and the check box is cleared. |
Full-width font | Select a font used to print full-width characters. For details of selectable fonts, see "Reference" in "4-4 Overview of items". |
Half-width font | Select a font used to print half-width characters. For details of selectable fonts, see "Reference" in "4-4 Overview of items". ReferenceWhen "None" is selected, the font specified as Full-width font is also used as the half-width font. |
Font size | Specify the font size to be printed in the range of 1 to 96 points. You can also change the value by clicking the |
Vertical magnification, Horizontal magnification | Specify the height and width ratio of characters. In the basic mode, you can only specify the magnification from 0.5, 1, 2, 3, 4, 6, or 8. RestrictionThere are restrictions on the combinations of magnifications supported by the model. |
Text direction | Select the print direction as vertical or horizontal. RestrictionIf Form language is Thai, this item is not displayed and Horizontal is applied. |
Bold | Select the check box to output the characters in bold. |
Italic | Select the check box to output the characters in italic. |
Outline | Select the check box to outline output characters. |
Outline width(dot) (Only in graphic mode) | When the Outline check box is selected, specify the line width for outline in dots. |
Mask/Image (Only in graphic mode) | When the Outline check box is selected, specify an image to output in the area enclosed by the outline. |
White-letter | Select the check box to output characters in white. |
Shadow | Select the check box to output characters with shadows. RestrictionThe specified character decoration may not be output depending on the model. |
Bookmark level | When using the bookmark feature of a PDF file, specify the bookmark hierarchy number in the range of 0 to 9. |
Gradation (Only in graphic mode) | Select the check box to fill text with a gradation color. |
Gradation | When Gradation is selected, specify the direction of gradation from the start point to the end point. The gradation changes depending on the start color, the end color, and the type settings as follows: 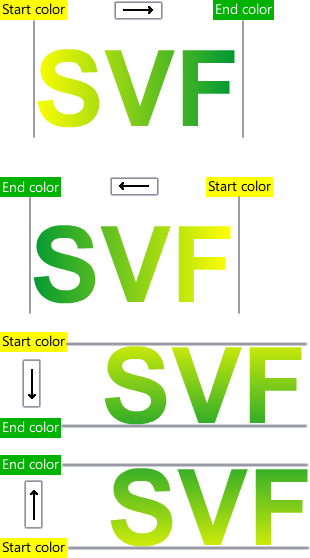 Difference by gradation types |
Report-writer
The operation of the VrSetForm function in mode 4 or 5 is called "report-writer mode". In SVF Cloud, the VrSetForm function works in mode 5, which means that the report writer mode is used.
Restriction
Numeric-type fields cannot display text.
In report-writer mode, the output of a form is controlled according to the following report-writer settings, such as key-break, that you specified when designing the form:
Report-writer features
Output sorted data
Control page breaks by using key-breaks
Auto-insert header records and total records
Control output data with an identical key (print on first page only, last page only, or print at the end of the group)
Control group-suppress
Clear accumulated value
Clear page count
Control the processing of R-type and G-type functions
Reference
For details of the VrSetForm function, see the corresponding page in "SVF Java PRODUCTS API Reference Manual".
You must specify a key ID in order to use the report-writer features. You can use the group suppress feature without specifying a key ID.
Item | Description |
|---|---|
Key ID | This setting is required to use the report-writer features. With the report writer features, you can control dynamic output on a form such as page break control, inserting records, and controlling display of duplicate data (group suppress). Specify a numeric value as the index key to be used for controlling data. If you specify "0", no key is specified. Specify the keys in order of 1, 2, 3 from the largest group to the smallest group. If the mode of the VrSetForm function is set to 5 or if "Sort" is specified for the output mode of Universal Connect/X, fields are sorted according to the specified key order and output. |
Descending order | Set the sort order for the fields for which a key ID is specified. When selecting the check box, sorts fields in descending order. When clearing the check box, sorts fields in ascending order. This option is enabled when you specify mode 5 of the VrSetForm function. |
Page break | Specify whether to break the page at the time of key break. When selecting the check box, inserts a page break. When clearing the check box, not insert a page break. |
Header record name | Specify a record name to be printed as the header record at the beginning or on a key-break. |
Total record name | Specify a record name to be printed as the total record at the beginning or on a key-break. |
First page only | Specify whether to print the field only on the first page when printing with the same key runs across multiple pages. When selecting the check box, prints the field only on the first page. When clearing the check box, prints the field on all pages. |
Last page only | Specify whether to print the field only on the last page when printing with the same key runs across multiple pages. When selecting the check box, prints the field only on the last page. When clearing the check box, prints the field on all pages. |
Print at the end of group | Specify whether to print only on the last line of the detail group. When selecting the check box, prints the field only on the last row. When clearing the check box, prints the field on all rows. |
Group-suppress | Specify whether to perform group-suppress. When the check box is selected, group-suppress is performed. When this option is selected and the data is the same as in the previous row, the field becomes blank. You can set group-suppress without specifying a key. Example 1: When group-suppress is not used Even when the same data is repeated, the data is printed in all rows. 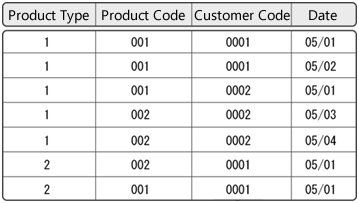 Example 2: When group-suppress is set for product type, product code, and customer code without specifying their keys Each field is suppressed individually.  Example 3: When product type, product code and customer code are specified as keys, and group suppress is set for each of them If the data of a higher key is changed, group-suppress is canceled even if the lower key has the same data as before. 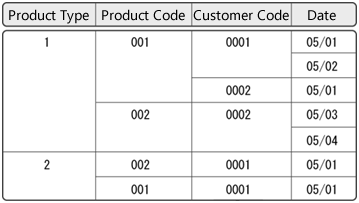 Group-suppress is disabled when total records are output. RestrictionGroup-suppress across multiple records is not supported. |
Group-suppress off | Group-suppress works when identical data is repeated. However, you can cancel the group-suppress when the selected contents change in a field. When selecting the check box, cancels group-suppress. Example: When specifying a key for product type, product code, and customer code, setting group-suppress for product type and product code, and canceling group-suppress for customer code If the contents of customer code change, group-suppress will be canceled for all other fields. When the data of a higher key ID is changed, the group range is fixed and a new group is started from the following data. Group-suppress off can only be set for a field with a key specified. 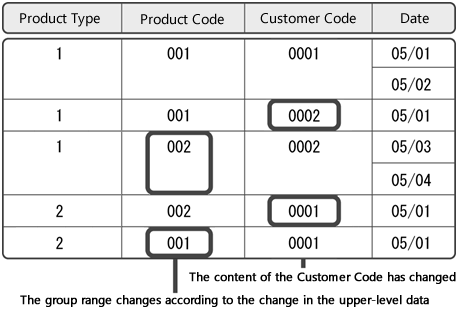 Group-suppress off |
Centering on duplicated | Specify whether to print the group-suppress results with centering in the cell. When selecting the check box centers, prints with centering on duplicated. 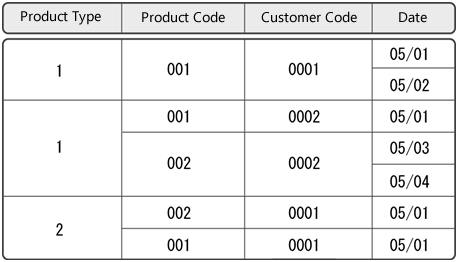 Print with centering data in cells RestrictionThe operation when used with the automatic link field is not supported. |
Suppress line on duplicated | Specify whether to suppress the frame of the record when identical data is repeated. When selecting the check box, suppresses the frame of the record. |
Clear accumulated value | Specify whether or not to restore the cumulative total value calculated using R-type statistical functions to "0". For details, see "5-4-5 Statistical functions" in "Chapter 5. Set calculation-formula and edit-formula". When selecting the check box, restores the cumulative total value to 0. |
Clear page count | Specify whether to restore the page count to 1 when a page break occurs due to a key-break. When selecting the check box, restores the page count to 1. Even if the form has two or more page break keys, set only one page break key per XML form file. CautionIf you want to restore the page count to 1 to output when a key-break occurs, specify to clear the page count in the key field. For a field to which a page count is output, you must use <system variable>_PAGE_CNT rather than the PAGE function. |
Multi-page
Item | Description |
|---|---|
Common | Specify whether to place the field also on the Common page. When selecting the check box, places the field on the Common page. The field is shared on all multi-pages and can be edited from any page. The field is also printed on all multi-pages. When clearing the check box, the settings for target pages appear. Select the check boxes of the pages to be output. |
Select print page n ("n" is any number) | When clearing the check box in Common, the settings for pages to be printed are displayed, so select the pages to be printed. |
page: Color ("n" is any number) | Specify the print color for each page. For details on the print colors, see "4-11 Color setting for items". |
Extended auto link mode
By using extended auto link mode, the output of data that has overflowed the page can be continued after a page break.
By using the VrComout("/{ALNK n}/") function, you can specify a mode individually at execution time. Set the mode by entering the setting value in "n". For details, see "SVF Java PRODUCTS API Reference Manual".
By changing the main property file (vfreport.properties.*), you can change the base settings. At execution time, it will be applied overall.
To enable extended auto link mode, start Property editor from the Option menu in SVF Configuration, and set the ReportWriter.AutoLinkMode key in the main property file (vfreport.properties.*) to a value other than zero.
You need a password in order to start Property editor. Contact our support center for the password.
The values and descriptions for each mode are as follows. "3" is used for SVF Cloud Designer.
Setting value | Description |
|---|---|
0 | Extended auto link mode is disabled, and operation is as before. If the auto-link field in the record does not fit within the page, output cannot be continued on the next page after a page break.  |
1 | If an auto-link field in the record does not fit within the page, it will be output at the beginning of the next page. If the data still does not fit inside that page, only the part that has overflowed the page will be output on the next page.  |
2 | For the auto-link field in the record, only the part that does not fit within the page will be output on the next page. Note that header records and total records will be output at the beginning of the next page if everything did not fit inside the page (same as 1).  |
3 | For the auto-link field in the record, only the part that does not fit within the page will be output on the next page (same as 2). Note that header records will be output at the beginning of the next page if all of them do not fit within the page (same as 1). |
Caution
In Report Director Enterprise, settings for extended auto link mode are only enabled at spool time.
If you change settings for extended auto link mode after spooling and print, operation will still be based on the settings at the time of spooling.
Restriction
When the extended auto link mode is enabled and there are multiple auto link fields with different font sizes in the same record, even if the large fields overflow from the page, the small fields may be displayed. However, even when it can be displayed, the page break will be performed for the same number of rows for all fields in the record.
When the font size is different
Auto link-fields and extended auto link mode are not supported in the case of the following settings:
When Direction of a subform is "Horizontal"
When Text direction of a field is "Vertical".
With extended auto link mode enabled, if you use auto link field, you can specify only limited values (0.5, 1, 2, 3, 4, 6, 8) for the vertical/horizontal magnification ratios even in the graphic mode.
FFEject
Set FFEject when you want to output the next page after a page break by key break when printing on both sides.
When a key break occurs on an odd page, the paper is ejected with the back side blank. When a key break occurs on even pages, the paper is ejected as it is.
Also, when the specified key is in a formcopy, processing of the remaining part of the formcopy frame is interrupted and then moved to the next page. After switching to the next page, the continuous formcopy process is resumed, and the content after the page break by key break is output. Because processing of the formcopy is interrupted, you can prevent an empty frame from being printed on the same page.
To set FFEject, enter "/{FFEject=1}/" in Comment for the field that is subject to key breaks.
FFEject is supported for all printer models.
Caution
Page break must be specified for the target field in Report-writer. For details on how to set report-writer, see "Report-writer".
If Page break is specified for multiple fields, and Clear page count is specified for one of those fields, FFEject is enabled only for that key.
For file output printer models, only interruption of the formcopy is performed.
Specify Search field (supported from Service Pack 2)
When Data type of a field is set to "Text", use the following procedure to set a search field name. The procedure and dialogs that appear vary between the basic mode and the graphic mode.
Click the
 Edit formula button in the Search field column.
In the graphic mode, skip this step.
In the Search field dialog, select a search field name and click the Edit button.
In the Edit dialog box, enter Search field name.
In the Search field dialog, you can cut out a part of the output value or convert text-type data into numeric-type data or date-type data.
Buttons in the Search field dialog have the following meaning:
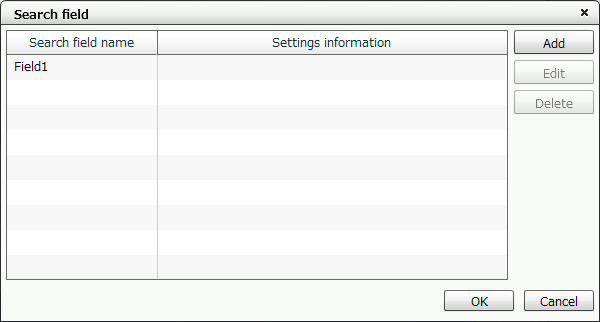
"Search field" dialog
Item | Description |
|---|---|
Add | Add when cutting out part of field value and setting multiple search fields. When multiple information is output in one field, the divided data can be used as a search condition. Click to display the Add dialog. |
Edit | Edit when changing the search field name or converting character type data to numeric type or date type. Click to display the Edit dialog. |
Delete | Deletes the selected search field. |
The items you can set in the Add and Edit dialogs are the same.
The setting items in the Add and Edit dialogs are as follows:
Item | Description | ||||||||||||||||||
|---|---|---|---|---|---|---|---|---|---|---|---|---|---|---|---|---|---|---|---|
Search field name | Specify a search field name. The initial value is set to the same name as the field Name. You can use alphanumeric characters, Kana, Kanji, and underscores (_). The name can be up to 30 bytes in length. Do not use a number for the first character of a search field name. | ||||||||||||||||||
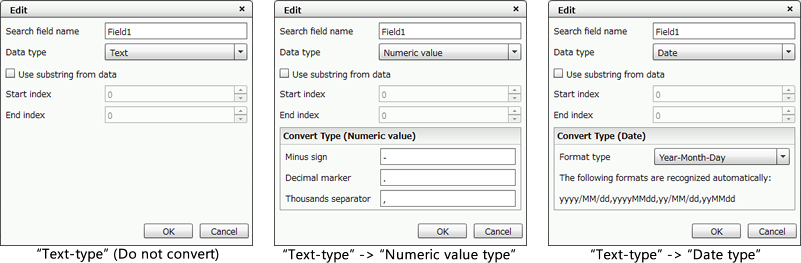
Data type | Select the data type for converting character data to numeric type or date type from "Text", "Numeric", and "Date". If you select "Text", the data type will not be converted. If you specify "Numeric value" or "Date", set the type conversion in displayed Convert Type (Numeric value) or Convert Type (Date). | ||||||||||||||||||
Use substring from data (Only in basic mode) | Specify whether to cut out the search target data by the index. If you select this check box, you can specify Start index and End index.
| ||||||||||||||||||
Convert Type (Numeric value) | Specified symbols are recognized and converted into numeric-type data. Symbols that are not recognized as numeric data will be removed or converted. Specify for each symbol defined with the format of text data to be output to PDF.
| ||||||||||||||||||
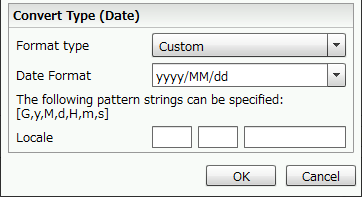
Convert Type (Date) | Text data in the specified format is converted into date-type data. If any date function is specified in Calculation-formula or Edit-formula, specify the format of the processing result of the function. Select from "Year-Month-Day", "Hour-Minute-Second", or "Custom".
|
Switch the field display
You can display a field placed on a form in the following three formats. To change the display format of these three fields, click the  Display settings button on the right toolbar, and select Field - Display type on Display settings.
Display type | Description | Display format |
|---|---|---|
Number of digits | The number of digits is displayed on the left end. |  |
Name | The field name is displayed. |  |
Padding | The field attribute is displayed. |  |
Rotate fields
You can rotate a field in any direction using the rotation handle.
Reference
You cannot use the rotation handle in the basic mode.
Select a field.
Move the pointer near the handle displayed on the right side of the field (on the lower right of the field for vertical writing).
While the mouse cursor changed to
 , drag the mouse in the rotation direction, referencing the guidelines and angle.
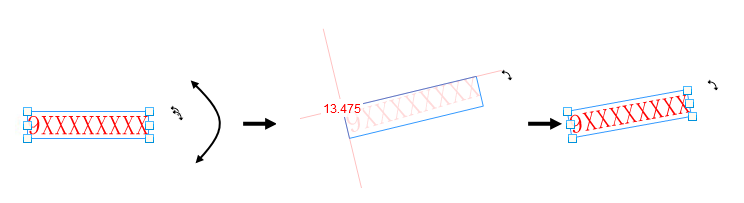
Field rotates in the dragged direction
Reference
You can also specify the rotation angle from Rotation angle in the properties.
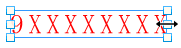
Change the number of digits of a field
To change the number of digits of a field without changing the pitch and font size, use the following procedure:
Select a field.
Move the pointer near one of the handles on the vertical/horizontal sides displayed around the field.
While the mouse cursor changed to
 , drag the mouse in the direction of character, referencing the guidelines.
The number of digits of the field increase or decrease without changing the pitch and font size.

The number of digits increases or decreases depending on the drag direction
Reference
You can also specify the number of digits of a field in Number of digits (print) in the properties.
Adjust the pitch of a field
Items such as quantity, unit price, and amount of money must adjust the 1000 separator lines of the form.
For such cases, adjust the field pitch to the digit width of the form.
Adjust the pitch as follows:
Select a field.
While the pointer changes to
, drag the right edge or left edge of the handle displayed around the field with pressing CTRL.You can change the pitch in dots while maintaining the number of digits.
Ctrl + drag to change pitch
Reference
You can also specify the pitch adjustment in Pitch(dot) in the properties.