Install SVF Cloud Agent on the client PC
To install the SVF Cloud Agent on the client PC, distribute the "installation package" created by the administrator to the client PC. Installation package creation must be performed by a user with system administrator permission.
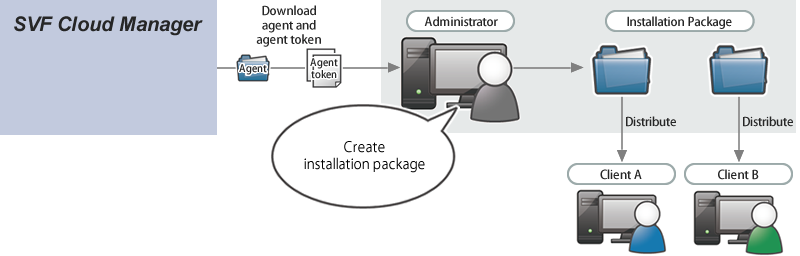
This section describes how to create an installation package.
For installation method on client PC using installation package, see "SVF Cloud Agent Setup Guide".
In addition, you need to select a launch method of SVF Cloud Agent when installing on a client PC. For details on how to start SVF Cloud Agent, see "Types of SVF Cloud Agent launch methods".
For details on the operating environments of SVF Cloud Agent, see the following page.
https://cs.wingarc.com/en/system_requirement/000007163
Caution
SVF Cloud tenant to which SVF Cloud Agent can connect
The SVF Cloud Agent can only connect to one tenant of SVF Cloud. So, for example, from one SVF Cloud Agent, you cannot connect to both production environment and Sandbox environment.
Log in to SVF Cloud Manager.
Click
 Agent to open the agent management screen.
Click the Open Agent Download Page button to display the download page. Download the agent that is suitable for your installation environment.

Save the Zip file of the downloaded agent in any hierarchy, and unzip it.
Click
 Environment Settings - Client Authentication to open the client authentication information management screen.
Click the Add Authentication Information button, and set the label.

By clicking the OK button on the completion screen, creation of the client authentication information is completed.
Reference
Share client authentication information
It is also possible to use one client authentication information on multiple client PCs.
However, if you delete the shared client authentication information, you will need to reinstall SVF Cloud Agent on all client PCs using the client authentication information.
Select the client authentication information.
Click Details - Download - Agent Token to download the agent token.

Place the downloaded agent token (secure file) in the following hierarchy and create an installation package.
<folder_of_module>\conf
You can set the installer behavior to any preferences.
Items that can be set and their initial values are as follows. For details on the setting file and the preferences items, see "Preferences items of SVF Cloud Agent installer".
Setting item
Default value
Default input value of installation destination folder
To start the agent at startup *1
C:\Users\<login_user_name>\AppData\Local\Programs\SVFCloudAgent
To start the agent as a service *1
OS is x86 32 bit
C:\Program Files\SVFCloudAgent
OS is x64 64 bit
C:\Program Files (x86)\SVFCloudAgent
Require input of agent name
Input is optional
Skip screen for entering proxy information
Skip
Proxy server address
(No default value)
Proxy port number
(No default value)
Automatic registration of default printer
Do not register automatically
Switch between EMF and EMFPLUS
EMFPLUS *2
Check whether a network printer can print
Do not check
*1 For details on starting the agent at startup and as a Windows service, see "Types of SVF Cloud Agent launch methods".
*2 When using EMFPLUS, the font specified in the form layout must be added to the client PC.
Creation of the installation package is now complete.
Distribute the created installation package to the client PC by email, etc.