SVF Cloud WebAPI
Create a form layout according to the following workflow.
This section explains the example of creating the following form layout.
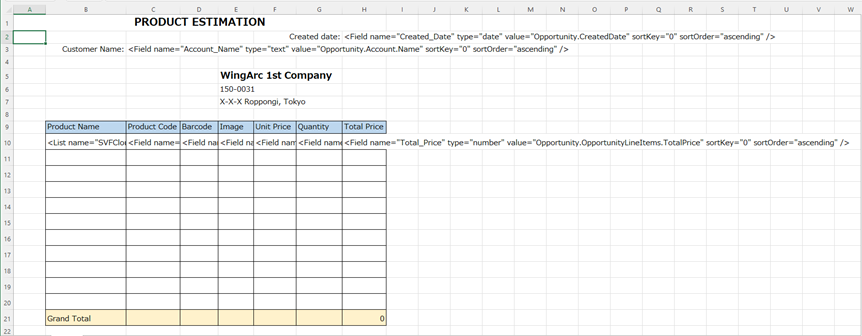
Form layout
"Meiryo" is specified as the font for all cells.
"Date" is specified as the display format in the formatting settings for a cell where a date is output.
The following format settings are applied to the cells where the quantity or the price is output.
Specify "Number" for the display format
Enable Use 1000 Separator (,)
Since a fixed list is used, the above format settings are applied to all the cells where a quantity or a price will be output within the output range of the list.
The height of a detail row is specified to be the same (because all detail rows in a fixed list must be the same in height).
The formula "=SUM(H10:H20)" is specified in the grand total cell in order to display the total amount of the details.
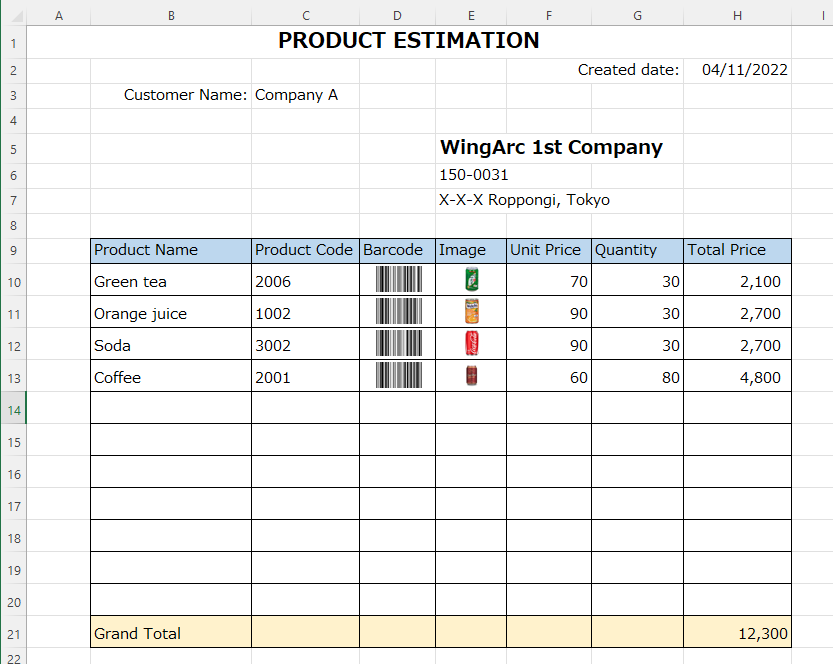
Input data
Created date, Account name, Product name, Product code, Barcode, Image, Unit price, Quantity, Sum
2022/01/31, Company A, Orange juice, 1002, 123456781002, resource/imageFile/orange.png, 90, 30, 4800
2022/01/31, Company A, Green tea, 2006, 123456782006, resource/imageFile/tea.png, 70, 30, 2100
2022/01/31, Company A, Soda, 3002, 123456783002, resource/imageFile/soda.png, 90, 30, 2700
2022/01/31, Company A, Coffee, 2001, 123456782001, resource/imageFile/cofee.png, 60, 80, 4800
The image files have been uploaded in the "imageFile" folder from the Resource screen of SVF Cloud Manager.
Place a field
Place a field in all the cells where data will be output.
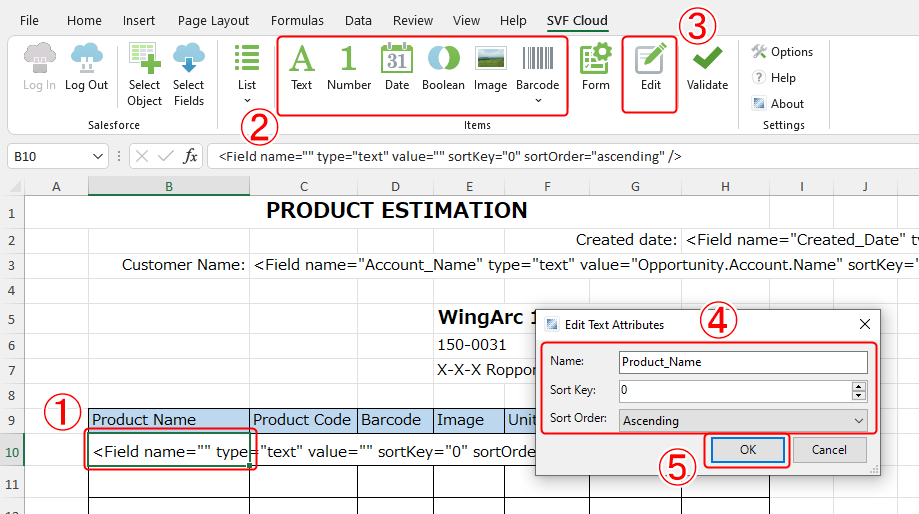
Select cells for outputting data.
To insert a field in a cell, click the button for the type of data to output (in this case, the Text button).
Reference
If a field already exists, it will be overwritten with the new field.
Note that common elements between fields (name attribute, and the like) are retained.
To edit the attributes of the field, click the Edit button.
Specify the attributes of the field. The attributes that can be specified depend on the field type.
Name (name attribute) is a required attribute. The value specified here will be the field name.
Reference
In the item row of the CSV file of input data, specify the field name.
Click the OK button to close the dialog box.
Create a list
Create a fixed list in the area where you want to output details.
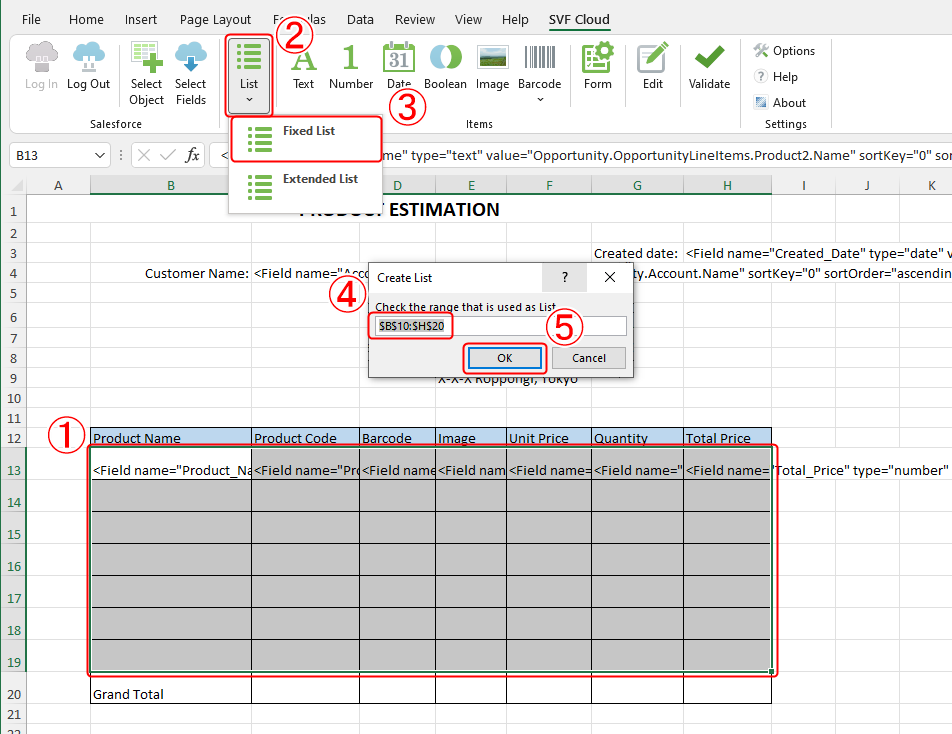
Select a range for outputting details.
To create a list, click the List button.
Select Fixed List.
A dialog for specifying the range of a list is displayed.
Make sure the dialog shows the selected range. You can modify the range of cells by modifying the values in the text box.
Click the OK button to close the dialog box.
A list tag is added to the top left cell in the selected range. If the cell already has a field, it will be prepended to the existing field.
<List name="SVFCloud_List_1" extend="false" onOverflow="error" recordRows="1" /><Field name="Product_Name" type="text" value="" sortKey="0" sortOrder="ascending" />In addition, the value and range of the name attribute of the list are also registered in the "Name" of Excel.
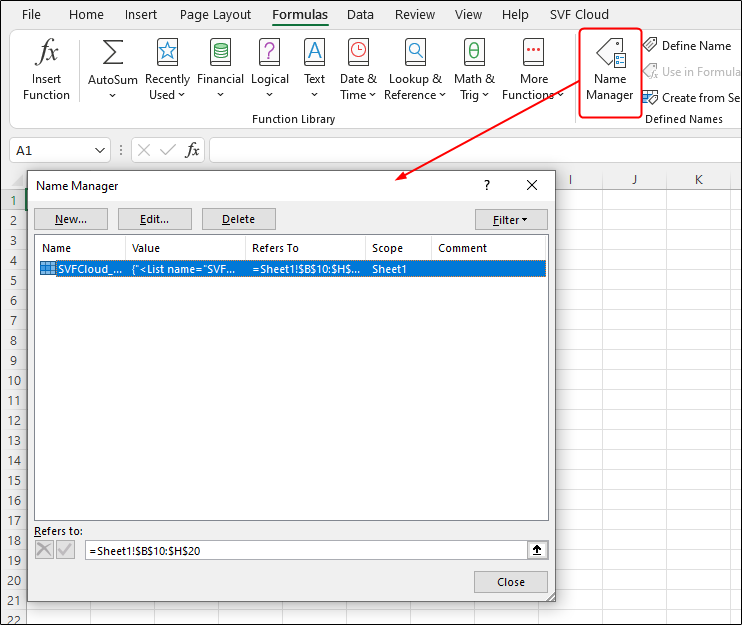
Reference
Delete a list
In order to delete a list, the following two steps are needed.
Remove the list tag from the cell
Delete the registered name in the Name Manager dialog
Validate tag descriptions
Check the design of the form layout for any errors.
If there are multiple fields with the same name in the sheet, or if there are any inconsistencies in specifying attributes, it will be reported as an error.

Click the Validate button.
The Validate dialog box is displayed.
To perform validation, click the Run button.
If an error is found, the cell in question and the error details are displayed.
If no error is found, nothing will be displayed in the dialog. Proceed to step 4.
Clicking on an error moves the focus to the cell that caused the error. Correct the field attributes, and so on according to the error details.
Click the Close button to close the dialog box.
Upload a Form Layout
Upload the created form layout from SVF Cloud Manager. For details on how to upload, see "Create a form layout in Microsoft Excel" in "SVF Cloud Administration Guide" for SVF Cloud Manager.