SVF Cloud for Salesforce
Here, we describe the procedure for creating an Excel form layout, using an example of outputting data from a Salesforce object ("Opportunity") to an Excel sheet ("PRODUCT ESTIMATION") which is already in use.
An overview of the example is as follows.
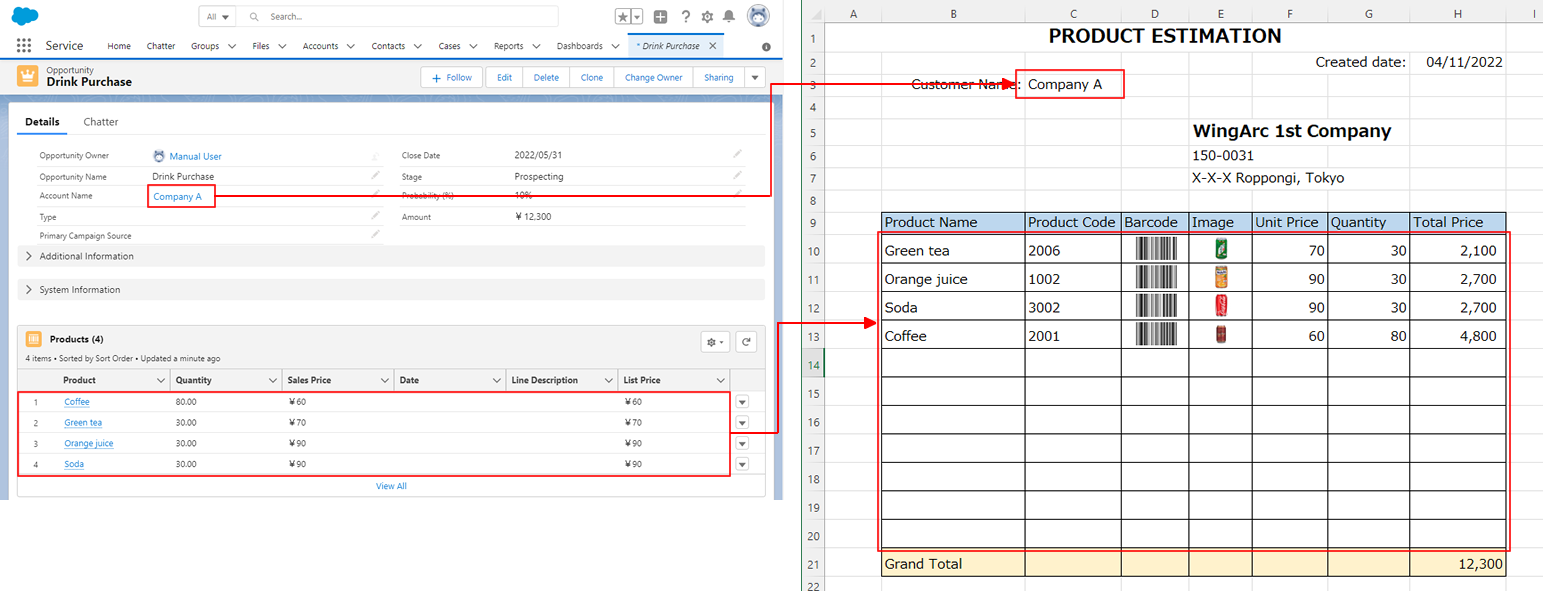
Salesforce data
It is assumed that multiple products are registered in the "Opportunity" object on Salesforce.
Product data includes quantity, amounts, barcode data (12-digit data for EAN 13-digit), and image paths. (The fields "Barcode" and "Image" are added to the object "Products.")
Excel sheet "PRODUCT ESTIMATION"
"Meiryo" is set as the font for all cells.
All cells containing quantities or monetary amounts will output a number, so "Number" is set as the Excel display format, with the checkbox for "Use 1000 separator (,)" is selected. (Because "fixed list" is used.)
The heights of rows that output details are aligned in advance. (Because "fixed list" is used.)
The formula "=SUM(H10:H20)" is set in the total amount cell in order to calculate total amount.
Output process for a form that uses an Excel form layout
The product information in the "Opportunity" object is output in the chart as one row for one product. (Using "fixed list".)
A barcode (with automatic addition of a check digit) is generated from the barcode data and then pasted in a specified cell.
An image file is acquired from the image path and pasted in a specified cell.
Acquire Salesforce fields for outputting to the form
Log in to Salesforce
Log in to Salesforce in order to acquire Salesforce data fields.
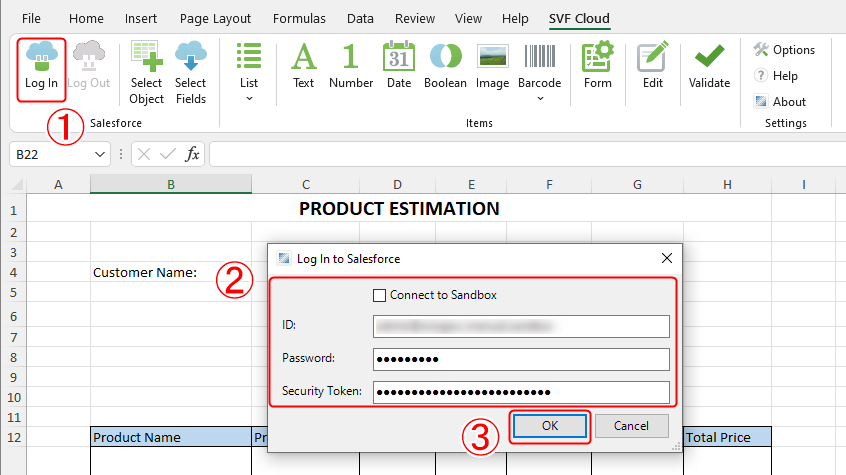
Click the Log In button.
The Log In to Salesforce dialog box appears.
Enter ID, password, and security token.
To log in to a Sandbox environment, select Connect to Sandbox.
Click the OK button.
Select a Salesforce object
Select a Salesforce object that includes data fields to output to an Excel form.
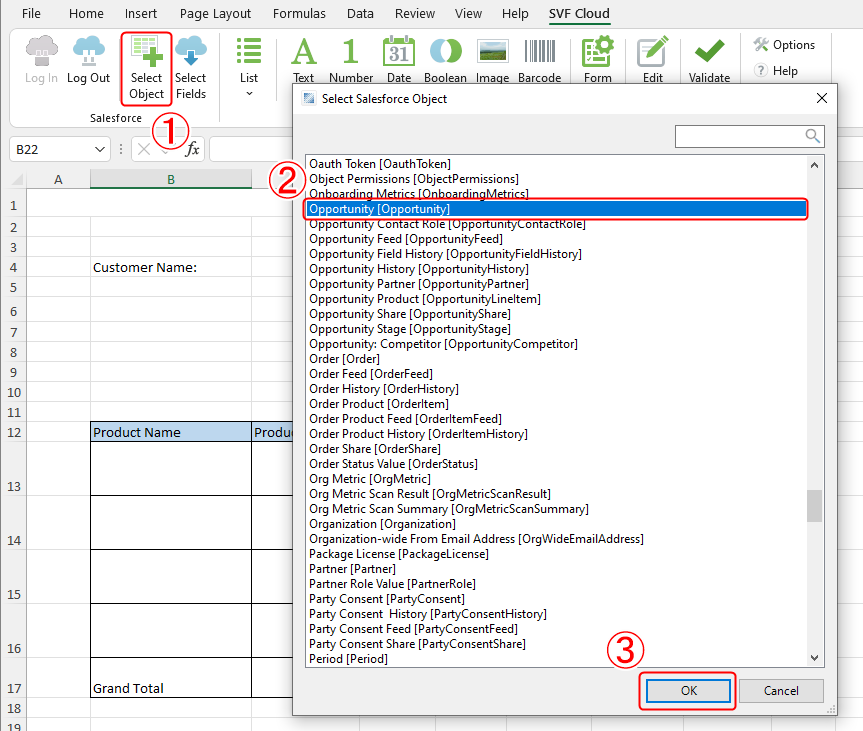
Click the Select Object button.
The Select Salesforce Object dialog box is displayed.
Select a Salesforce object ("Opportunity" for this example) that includes the data fields to output to an Excel form.
Click the OK button.
Select the field to output to the form
Select the Salesforce object field to output to the Excel form.

Select the cell to which tag information is deployed.
Click the Select Fields button.
The Select Fields dialog box is launched, and the fields included in the selected Salesforce object are displayed.
Select the fields to output to the Excel form.
Click the OK button.
The selected fields are displayed in the Select Fields dialog.
Adjust how to deploy fields to Excel.
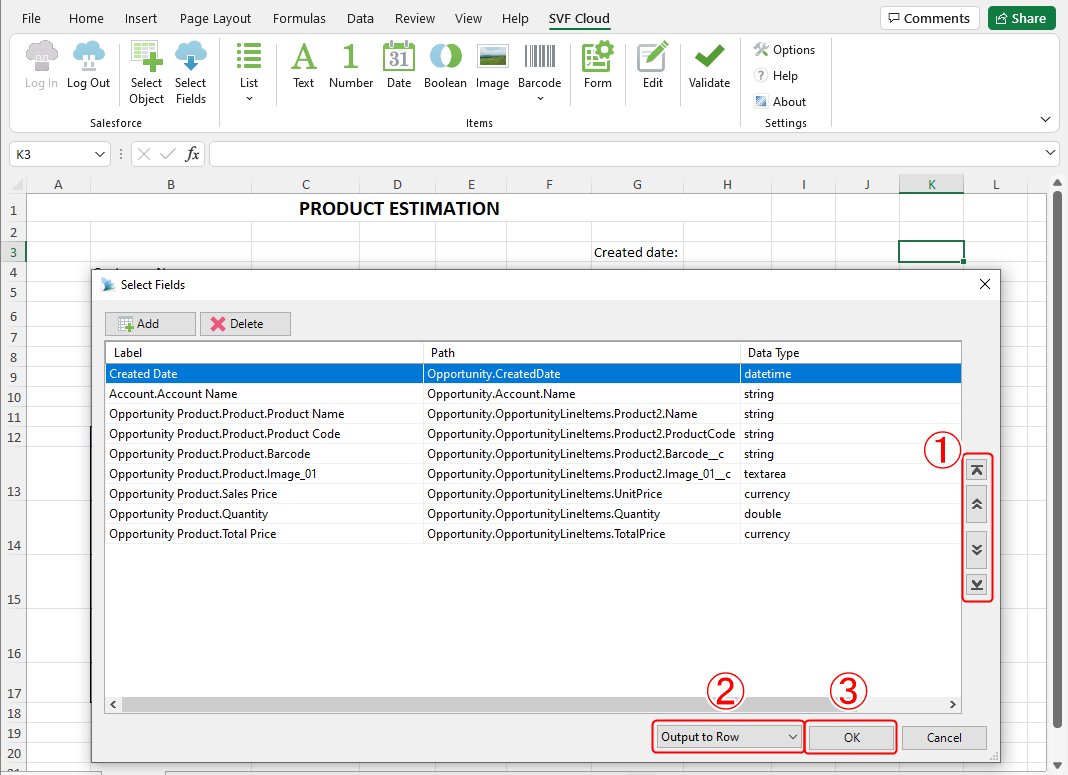
Use either the up or down arrow buttons in the Select Fields dialog box to adjust the arrangement of fields deployed to Excel.
(To make this example easy to understand, we arrange fields in the order they are output to the form)
Select the expansion direction for fields in Excel, either Output to Row or Output to Column.
(For this example, select "Output to Row" (deployed vertically) so that the tag description is easy to confirm in Excel after deploying it.)
Click the OK button.
Tag information for the selected field is deployed to Excel.
Place a field
Adjust tag descriptions
Adjust the following deployed tag descriptions to match the data output to Excel.
<Field name="Created_Date" type="date" value="Opportunity.CreatedDate" sortKey="0" sortOrder="ascending" />
<Field name="Account_Name" type="text" value="Opportunity.Account.Name" sortKey="0" sortOrder="ascending" />
<Field name="Product_Name" type="text" value="Opportunity.OpportunityLineItems.Product2.Name" sortKey="0" sortOrder="ascending" />
<Field name="Product_Code" type="text" value="Opportunity.OpportunityLineItems.Product2.ProductCode" sortKey="0" sortOrder="ascending" />
<Field name="Barcode" type="text" value="Opportunity.OpportunityLineItems.Product2.Field2__c" sortKey="0" sortOrder="ascending" />
<Field name="Image" type="text" value="Opportunity.OpportunityLineItems.Product2.Field1__c" sortKey="0" sortOrder="ascending" />
<Field name="Sales_Price" type="number" value="Opportunity.OpportunityLineItems.UnitPrice" sortKey="0" sortOrder="ascending" />
<Field name="Quantity" type="number" value="Opportunity.OpportunityLineItems.Quantity" sortKey="0" sortOrder="ascending" />
<Field name="Total_Price" type="number" value="Opportunity.OpportunityLineItems.TotalPrice" sortKey="0" sortOrder="ascending" />

Tag with the name attribute "Barcode"
In order to convert barcode data to EAN 13-digit barcodes to output to Excel, convert the field type from "text" to "barcode".
Select cell where a "Barcode" (name attribute) tag is placed.
Click the Barcode button.
Select "EAN13".
Field type is changed to "barcode" tag information.
<Field name="Barcode"type="barcode"value="Opportunity.OpportunityLineItems.Product2.Field2__c"symbol="ean13" padding="10%" verticalAlign="middle" horizontalAlign="center"/>
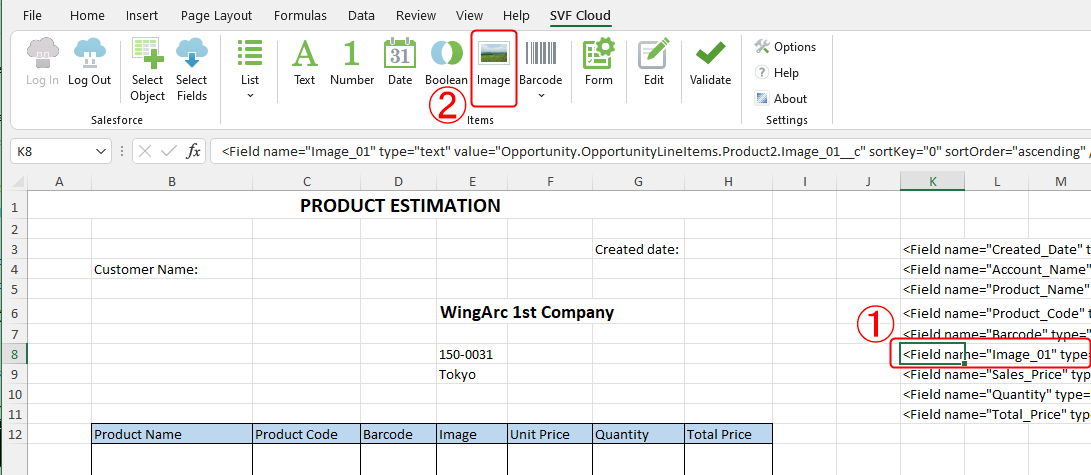
Tag with the name attribute "Image"
In order to acquire the actual image file from the image path to output to Excel, convert the field type from "text" to "image".
Select cell where a "Image" (name attribute) tag is placed.
Click the Image button.
The field type is changed to "image" tag information.
<Field name="Image"type="image"value="Opportunity.OpportunityLineItems.Product2.Field1__c"stretch="uniform" padding="10%" verticalAlign="middle" horizontalAlign="center"/>
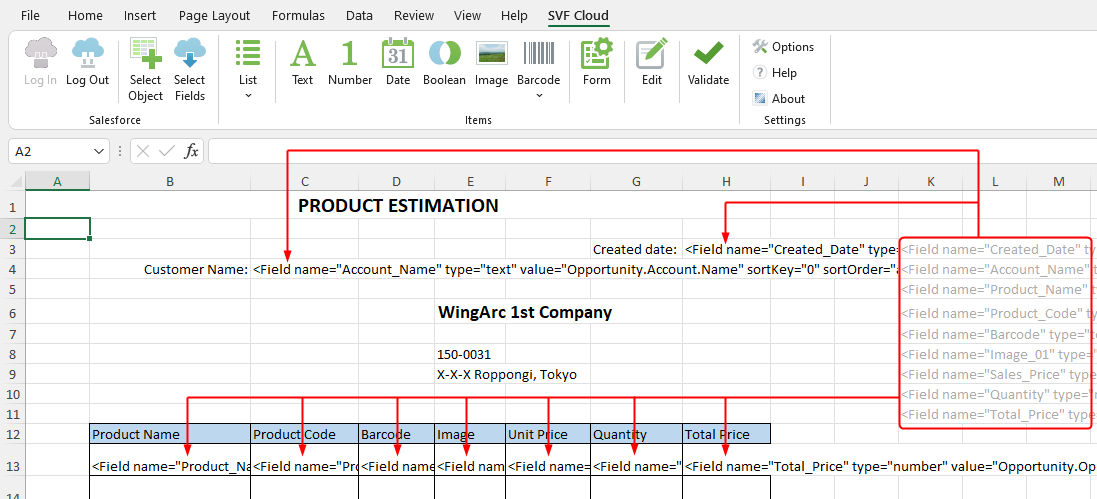
Place a field in an output location
Place all data tag information in cells where the data is actually output. Place data for output to the list in the first row of the chart.
Reference
When pasting tag descriptions, select "Value" in Paste Special option so that the format set in the destination cell is not changed.
Caution
For cells with fields whose attribute "type" is "date", you must set the display format as "Date" in the cell format settings.
Create a list
The area for outputting list of data is created as a list.
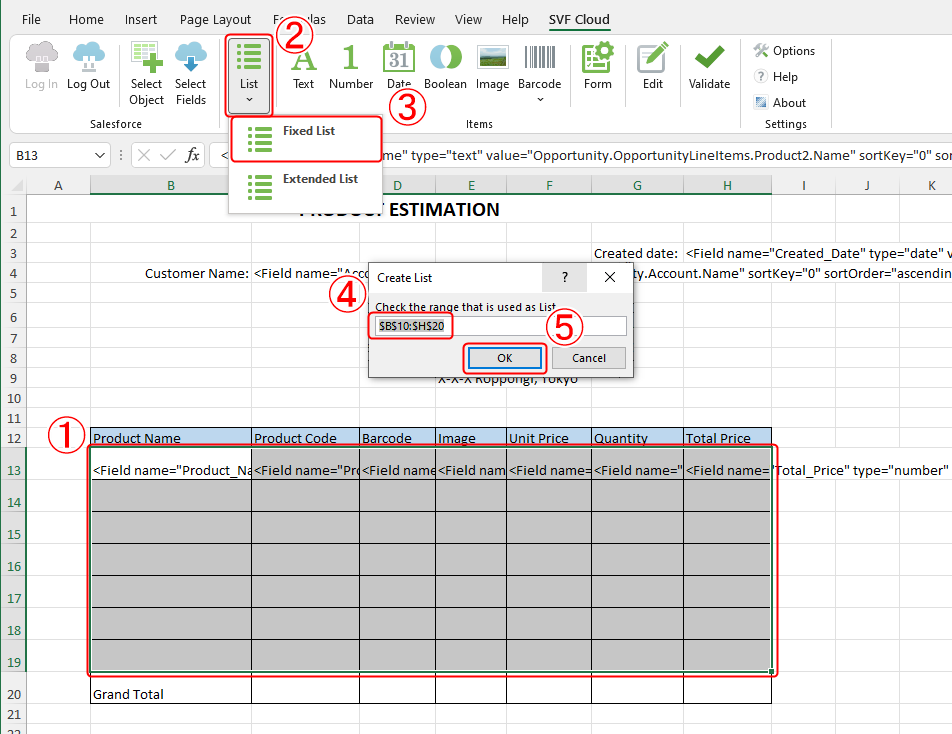
Select the range of cells for outputting the list of data.
Click the List button.
Select Fixed List.
The Create List dialog box is displayed.
Check that the cell range specified in the Create List dialog box is set.
You can redo the cell range selection here too.
Click the OK button.
List tag information is added before the field tag information indicated in the upper left cell of the selected range.
<List name="SVFCloud_List_1" extend="false" onOverflow="error" recordRows="1" /><Field name="Product_Name" type="text" value="Opportunity.OpportunityLineItems.Product2.Name" />Also, the selected range (list) is recorded as a name in Excel, and the value of the list attribute "name" is specified as the same name.
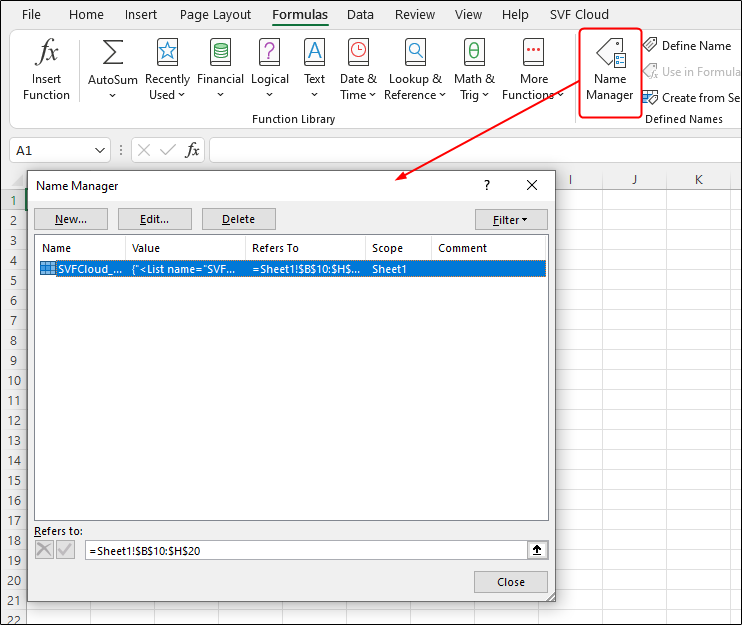
Reference
The name is not deleted from Excel even if you delete the list tag information from the cell. You must delete it separately in the Name Manager dialog box.
Validate tag descriptions
Check whether there are any errors in the tag information set in the Excel sheet.

Click the Validate button.
The Validate dialog box is displayed.
Click the Run button.
If validation is executed and an error is found, the error and relevant cell will be displayed in the Validate dialog box.
Reference
This issue occurs when multiple fields in the sheet have the same attribute "name" or there is an inconsistency in the attribute specification.
This validation checks the tag description format. Therefore, it does not check whether or not the item specified by attribute "value" actually exists in Salesforce.
If you select an error, the focus shifts to the cell where the error occurred. Fix the error as necessary.
Click the Close button to close the Validate dialog box.
Save an Excel form layout
Save Excel form layouts as "Excel workbook (*.xlsx)" or "Excel macro-enabled workbook (*.xlsm)".
Reference
To output forms using Excel form layout, you must upload the Excel form layout to SVF Cloud Manager. For details on how to upload, see "SVF Cloud Administration Guide" for SVF Cloud Manager.
If adjusting the output result after confirmation, please refer to tag references to adjust the attribute values.