4-9-1 Output a sentence (TextFrame)
When you want to print long text, "text frame" is useful for which you can configure text wrapping, paragraph settings, and so on.
The text frame allows you to create a dynamic text by referencing other fields within the document.
Restriction
Text frame can only be used for Japanese and English forms.
Repeat items cannot be created in a text frame.
If you use the following symbols in text strings output by the text frame, the form is output without the text strings in the text frame. To output the following symbols, use entity references (strings in parentheses in the following) instead of symbols themselves.
<(<)
>(>)
"(")
'(')
&(&)
Half-width space ( )
If it is difficult to use entity references, you can use the REPLACE function to convert symbols in text strings into entity references.
Example 1. Example of converting symbol "&" to entity reference "&"REPLACE(testField, "&", "&")
To convert a symbol, double quotation ("), specify it as follows (double quotation cannot be specified in search strings).
Example 2. Example of converting double quotation (") from symbol to entity referenceREPLACE(testField, CHR(34), """)
Place the text frame
Follow the procedure below to place a text frame:
Click the
 Create TextFrame button in the toolbox and move the pointer over the Form Editor.
The pointer changes to
 .
.Point to any position on the form and drag the mouse as you draw a rectangle to specify the frame size. This operation places the text frame within the specified area. Then, the Edit string dialog appears.
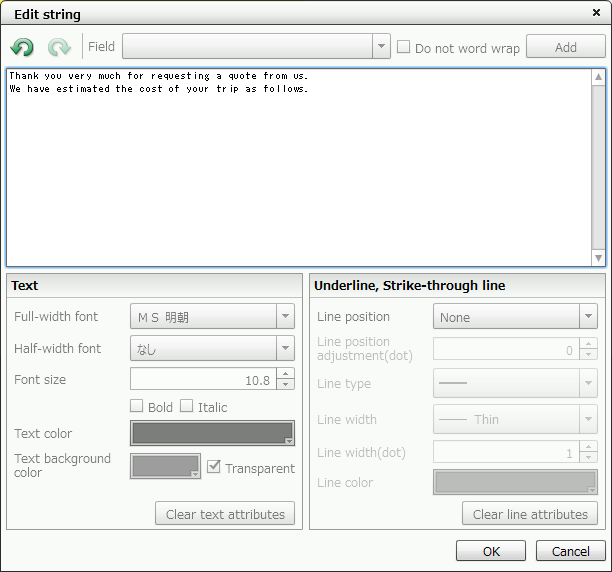
Input character string in the text box in the upper section of the Edit string dialog.
Type a text string
Configure the various settings. For details, see "Input a dynamic text that references fields" and "Set decorations for input text" in this section.
After configuring all the settings, click the OK button.
The Edit string dialog closes, and the input text will be displayed in the text frame on the form.
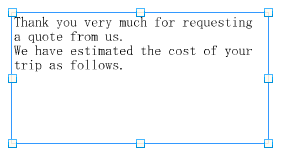
The entered text appears in the text frame on the form
Restriction
If a text string exceeds the area of the text frame, the exceeding part will not be output.
If you copy the text within the same text frame, the text decoration settings are also passed onto the pasted text.
Unicode IVS (variation characters) is not supported for strings in text frame items.
Set the text frame properties
Configure the text frame properties. Properties are categorized into General, Line, Format, Area settings, Space, Indent, Linefeed, Row-alignment, Typesetting ,and Multi-page, and are grouped by tab.
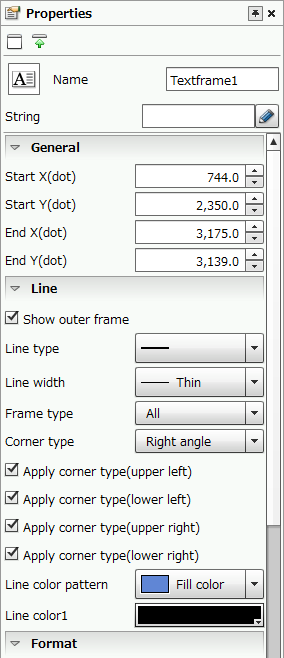
Text frame properties
Common settings
Item | Description |
|---|---|
Name | Type the text frame name. If the text frame name is not specified, the item name (TextFrame) and the name along with the created sequential number are automatically specified. The name can be up to 30 bytes in length. You can use alphanumeric characters, Kana, Kanji, and underscores (_). You cannot use a number for the first letter of the name. |
String | Input character string to be displayed in the frame. You can set it on the Edit string dialog which is displayed by clicking the |
General
Item | Description |
|---|---|
Start X(dot) | Specify the X coordinate of the top left corner of the text frame. You can also change the value by clicking the |
Start Y(dot) | Specify the Y coordinate of the top left corner of the text frame. You can also change the value by clicking the |
End X(dot) | Specify the X coordinate of the bottom right corner of the text frame. You can also change the value by clicking the |
End Y(dot) | Specify the Y coordinate of the bottom right corner of the text frame. You can also change the value by clicking the |

Line
Item | Description |
|---|---|
Show outer frame | Specify whether or not to show the border for the text frame. When the check box is selected, the border is displayed. |
Line type | Select the type of ruled lines. Restriction
|
Line width | Select the line width. Set the line width freely using Line width(dot) below if you select Free(dot). |
Line width(dot) | Set the line width in dots if you have selected Free(dot) in Line width. RestrictionThe line width may not be accurately displayed when the screen display is not "400%". |
Frame type | Select All or Each for the frame type. If you select All, the same settings apply to all the borders. If you select Each, you can set the show/hide, Line width, and Line type settings for each of the top, bottom, right, and left ruled lines. |
Corner type | Select the shape of the corners of the rectangle.
|
Apply corner type(upper left) Apply corner type(lower left) Apply corner type(upper right) Apply corner type(lower right) | Select the corner positions where the shape is to be changed. If you select a check box, the corner appears in the shape selected in Corner type. If you clear a check box, the corner will be right angle. |
Corner radius(dot) | Specify the corner radius when you select Cut, Round, or Inverted round for Corner type. |
Line color pattern | Specify the fill pattern of the frame. |
Hatching | Specify the tile pattern if you have selected Hatching in Line color pattern. |
Hatching line width(dot) | Set the hatching line width if you have selected Hatching in Line color pattern. |
Hatching line interval(dot) | Set the hatching line interval if you have selected Hatching in Line color pattern. |
Gradation direction | If Gradation2 is selected in Line color pattern, specify the direction of gradation from the start to end point. The gradation changes depending on the end color and the type. 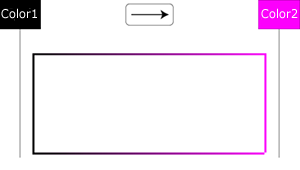
|
Line color1 | Select the border color of the text frame. |
Line color2 | When you selected Hatching in Line color pattern, specify the tile line color. Specify the end color of the gradation if you have selected Gradation2 in Line color pattern. |


Format
Item | Description |
|---|---|
Full-width font | Select a font used to print full-width characters. This setting will be the initial value of Full-width font in the Edit string dialog. For details of selectable fonts, see "Reference" in "4-4 Overview of items". |
Half-width font | Select a font used to print half-width characters. This setting will be the initial value of Half-width font in the Edit string dialog. For details of selectable fonts, see "Reference" in "4-4 Overview of items". ReferenceWhen None is selected, the font specified as Full-width font is also used as the half-width font. |
Font size | Specify the size of fonts to print in units of points. You can specify the font size within the range of 1 to 96 points. This setting will be the initial value of Font size in the Edit string dialog. You can also change the value by clicking the |
Bold | Select the check box to output the characters in bold. This will be the initial value of Bold in the Edit string dialog. |
Italic | Select the check box to output the characters in italic. This setting will be the initial value of Italic in the Edit string dialog. |
Text color | Specify the color of the text. This setting will be the initial value of Text color in the Edit string dialog. |
Text background color | Specify the background color of the text. This setting will be the initial value of Text background color in the Edit string dialog. This cannot be selected when the check box for Make text background color transparent is selected. |
Make text background color transparent | When text overlap with other items, specify whether or not to set the background color of the text as transparent. CautionIf you select Make text background color transparent after specifying a color in Text background color, the first color in the palette color is used as the text background color. |
Area settings
Item | Description |
|---|---|
Wide area adjustment | Specify whether to automatically reduce the size of the text so that all text is output when a text that does not fit into the text frame is entered. If you select the "Wide area adjustment" check box, the text size is automatically reduced at the interval specified in Adjustment amount with the value specified in Minimum character size as the lower limit so that the text fits into the frame. For example, if you specify "10" for Minimum character size and "0.1" for Adjustment amount, the size of text in the text frame is automatically reduced by 0.1 point from the current size to 10 points so that the text fits within the text frame.  When "Wide area adjustment" is disabled (left) and when "Wide are adjustment" is enabled (right) |
Minimum font size | Specify the minimum character size of text to be automatically reduced in points when "Wide area adjustment" is enabled. Specify it in the range of 1 to 96 points (The initial value is "1"). You can specify when the "Wide area adjustment" check box is selected. |
Adjustment amount | Specify the interval by which the character size is reduced in points when "Wide area adjustment" is enabled. Specify it in the range of 0.1 to 95 points (The initial value is "0.5"). You can specify when the "Wide area adjustment" check box is selected. |
Space
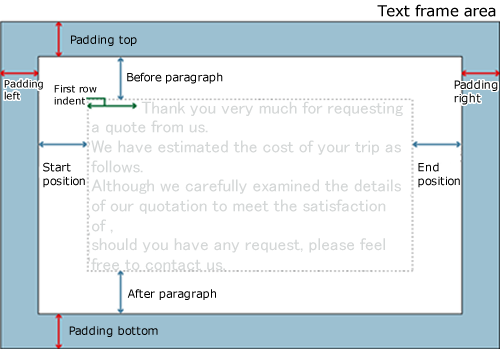
Relationship between margins and indents
Padding top(dot) Padding bottom(dot) Padding left(dot) Padding right(dot) | Specify the margin within the range of 0 to 10,000 dots on the top, bottom, left and right of the text frame. You can also change the value by clicking the |
Indent
Item | Description |
|---|---|
First row indent(dot) | Specify the indent for the first row of text string. You can also change the value by clicking the |
Start position(dot) | Specify the start position for the text indent. You can also change the value by clicking the |
End position(dot) | Specify the indent for the end position for the text. You can also change the value by clicking the |
Before paragraph(dot) | Specify the indent before the paragraph. You can also change the value by clicking the |
Linefeed
Item | Description |
|---|---|
Mode | You can select Line spacing (Fixed linefeed), Percentage (Automatic linefeed), Minimum (Automatic linefeed), or Line spacing (Automatic linefeed). You can set the line space by selection of the Mode and specifying numeric value in Value(dot) or Percentage. |
Value(dot) |
|
Percentage |
|
Row-alignment
Item | Description |
|---|---|
Horizontal | Select the left and right line-alignment of the paragraph. ReferenceStretch-justify aligns the character string to fit both sides. For the last line, or if there is only one line, it will be left-aligned. |
Vertical | If the font sizes vary in a line, select a base position (horizontal). Baseline indicates a base position to align different sizes of strings with. It differs according to the font type. 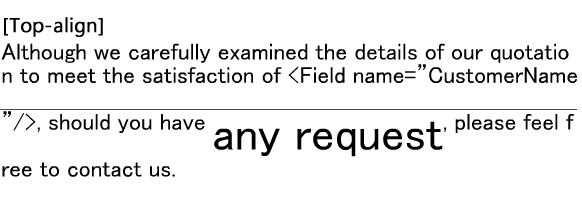 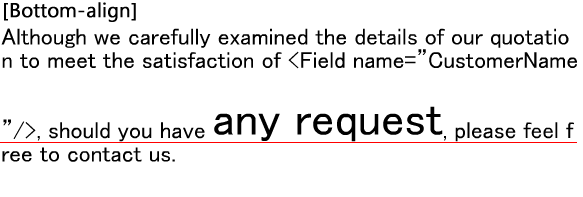 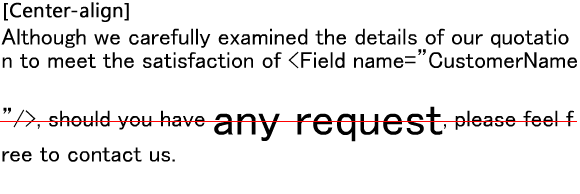 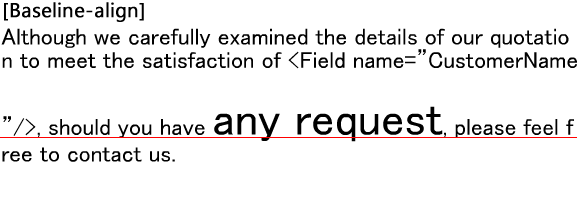 |
Typesetting
Item | Description |
|---|---|
Enable free space adjustment | As per the combination of characters (types), insert spaces and fill gaps between the characters. This is mainly used when you want to adjust and place the characters (at the end of a line) properly within a line. |
Enable Kinsoku rules | Adjusts so that English words and the data in fields specified not to be wrapped are not line-fed. In Japanese forms, in addition to this adjustment, line-feed and letter-spacing are performed so that characters not to be placed at the end of line should not be placed at the end of line (line ending prohibition), and characters not to be placed at the beginning of line are not placed at the beginning of line. When line breaking rules are disabled, the "Do not word wrap" setting is also disabled for field reference. |
Enable deletion of space at end of line | When a line is automatically wrapped, blank characters carrying on from the end of that line up to the beginning of the next line are deleted and the next line starts from a character other than a blank. |
Multi-page
Item | Description |
|---|---|
Common | Specify whether to place the field also on the Common page. When selecting the check box, places the field on the Common page. Text frames are shared on all multi-pages and can be edited from any page. The field is also printed on all multi-pages. |
Select print page n ("n" is any given number) | When deselecting the Common check box, select check boxes for the pages to print. |
Insert a dynamic text by referencing fields
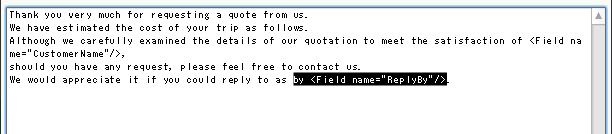
Text frame can create a dynamic text by making it reference other fields on a form within text and automatically embedding retrieved text to the specified field position.
Caution
Reference fields must be created in advance.
In the following example, the field "Customer Name" is referenced within the text.
Select the text frame and click the
 Edit formula button on the right edge of the String column in the Properties Editor.
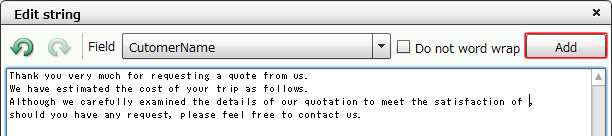
Move the pointer to the position to insert the field name in the text box of the Edit string dialog.

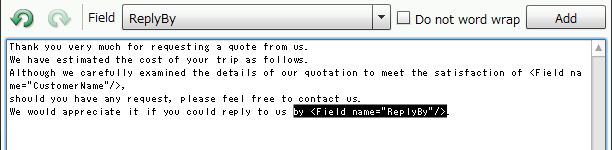
Move the pointer to the position where the field name will be inserted
Click the Field column to display a list of fields that can be referenced in the text frame. Select the field name to be referenced from the list.

Select the referenced field in the "Field" column
Click the Add button.
Click the "Add" button
A tag string representing a link with the field is inserted at the pointer position in the text box.
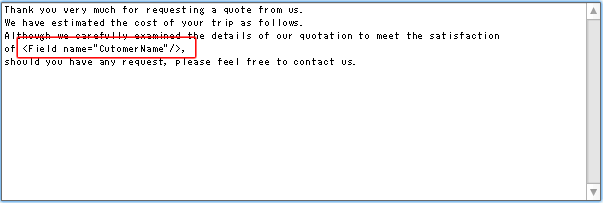
A tag string is inserted at the pointer position
Select the Do not word wrap check box before inserting a tag string to prevent data set in the field from being spread across multiple lines when outputting the data.
If you select the Do not word wrap check box and "XXX Computers Co., Ltd." is output in the "CustomerName" field, the output text string is displayed without word wrapping across multiple rows.
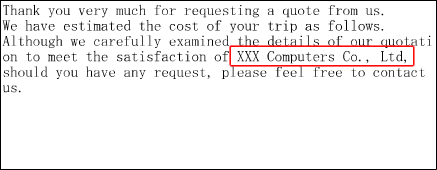
When "Do not word wrap" is selected
Reference
To enable the Do not word wrap setting, you need to select Enable Kinsoku rules.
For details on Enable Kinsoku rules, see Typesetting.
Do not word wrap setting is applicable to character strings. Therefore, when you place the same field in multiple positions and Do not word wrap is enabled for any one of these fields, all the fields are the target of the Do not word wrap.
Also, if the same character string is output for different referenced fields, it will be the target of Do not word wrap. The same is true for static text. If the width of the text string with the Do not word wrap setting enabled is greater than the width of the text frame, the Do not word wrap setting is ignored and the text string is segmented.
When changing the "Name" of the referenced field, the name of the corresponding field embedded in the text frame is updated automatically.
Copying the text frame and pasting it in a different XML form file will retain the tag representing the link with the field even if the referenced field does not exist in that XML form file.
Restriction
If the referenced fields are deleted, the tag string linked with the text frame is not deleted. You must delete it manually.
If mask settings are applied to the referenced field, the field is not available for reference within the text frame.
If you do not want to print the referenced field while referring to the data, use "Page Mask". For details, see "4-6-12 Set area excluded from printing (Page mask)".
Restrictions on referencing fields
The restrictions on inserting a dynamic text which references other fields are as follows:
Among the properties of referenced fields, the following setting values are ignored:
X(dot), Y(dot), Pitch(dot), Full-width font, Half-width font, Font size, Vertical magnification, Horizontal magnification, Text direction, Rotation angle, Bold, Italic, Outline, Outline width(dot), Mask/Image, White-letter, Shadow, Gradation, Gradation start color, Gradation end color, and Gradation type
The hierarchy of a text frame determines the hierarchy of the referenceable field. In the following table,
 means the hierarchy that can be referenced, and
  means the hierarchy that cannot be referenced. If you design a text frame within a record or formcopy and want to reference data for each output timing, place the field at the same hierarchical level.
Hierarchy of field
Hierarchy of text frame
Directly under the paper
Record
Formcopy
Directly under the paper
Subform
Record
Formcopy
Set decorations for typed text
The value currently set in properties will be the default setting of the text style in the text frame.
Use the Edit string dialog to change the decoration settings, such as font, font size and text color, for a part of the text in the text frame.
Select the text frame and click the
Edit formula button on the right edge of the String column in the Properties Editor.Select any part of the text to specify decoration settings in the text box of the Edit string dialog.
Select the text to change the style
Set Text and Underline, Strike-through line.
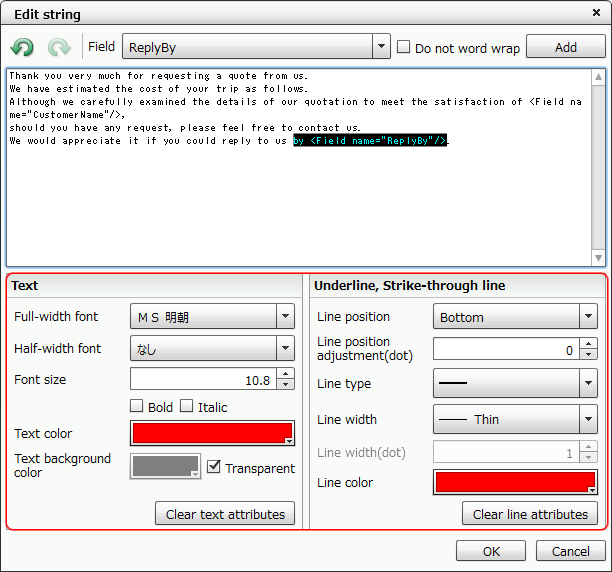
"Edit string" dialog
Text
Item | Description |
|---|---|
Full-width font | Specify a full-width font for the selected text string. For details on selectable fonts, see "Ref." in "4-4 Overview of items". |
Half-width font | Specify a half-width font for the selected text string. For details on selectable fonts, see "Ref." in "4-4 Overview of items". ReferenceWhen "None" is specified, the font specified as Full-width font is also used for Half-width font. |
Font size | Specify the font size for the selected text string range in the range of 1 to 96 points. You can also change the value by clicking the |
Bold | Apply bold to the selected text string range. |
Italic | Apply italic to the selected text string range. |
Text color | Specify font color for the selected text string range. |
Text background color | Specify background color for the selected text string range. This setting is enabled when the Transparent check box is cleared. |
Transparent | When text overlap with other items, specify whether or not to set the background color of the text as transparent. |
Underline, strike-through line
Item | Description |
|---|---|
Line position | Specify the position of an underline or strike-through line to draw for the selected text string. |
Line position adjustment(dot) | Specify fine adjustment of line position in dots. You can also change the value by clicking the |
Line type | Specify the type of an underline or strike-through line. |
Line width | Specify the width for an underline or strike-through line. |
Line width(dot) | If you select Free(dot), the line width can be specified in dots. You can also change the value by clicking the |
Line color | Specify color of underline or strike-through line. |
Caution
On the display on the Edit string dialog, the reflection of the underline and strike-through line settings has the following restrictions:
Line position
Top and Center are displayed at the center.
Baseline and Bottom are displayed at the bottom.
Line type
Even if selecting "dashed line" or others, all lines are displayed as straight line.
Line width
Regardless of the selected line width, all lines are displayed in the same line width.
Line color
The underline or strike-through line is displayed in the text color currently set for the underline.
Click the OK button to close the Edit string dialog and reflect the settings to the text frame on the form.
Click the Cancel button to close the Edit string dialog and discard the settings.
Reference
If you select Make text background color transparent after specifying a color in Text background color, the first color in the palette color is used as the text background color.
When you change the format of the tag with the referenced field embedded, that format is reflected in the output string.
Restore decoration settings (text) to default
Use the following procedure to restore the settings specified for a given range of a text string, such as font, text decoration and color, to their defaults.
Select the text frame and click the
Edit formula button on the right edge of the String column in the Properties Editor.Select the character string you want to return to the initial value in the text box of the Edit string dialog.
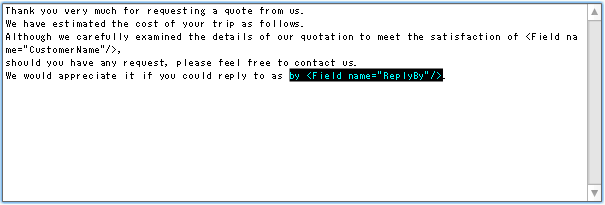
Select the text string to restore to default
Click the Clear text attributes button in Text.
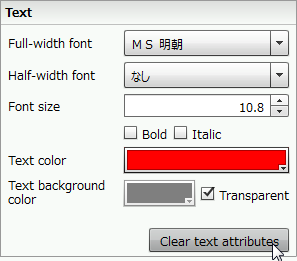
Click the "Clear text attributes" button
The decoration settings of the selected text string will be restored to their defaults.

Restored to default
Restore decoration settings (underline or strike-through line) to default
Use the following procedure to restore the settings specified for a given range of a text string, such as the underline or strike-through line, to their defaults.
Select the text frame and click the
Edit formula button on the right edge of the String column in the Properties Editor.Select the character string you want to return to the initial value in the text box of the Edit string dialog.
Select the text string to restore to default
Click the Clear line attributes button in Underline, Strike-through line.

Click the "Clear line attributes" button
The underline or strike-through line settings of the selected text string will be restored to their defaults.

Restored to default