4-12-1 Test print operations
Use the following procedure to print a test page:
Click the
 Print button on the toolbar.
Set the various items in the Test print dialog.
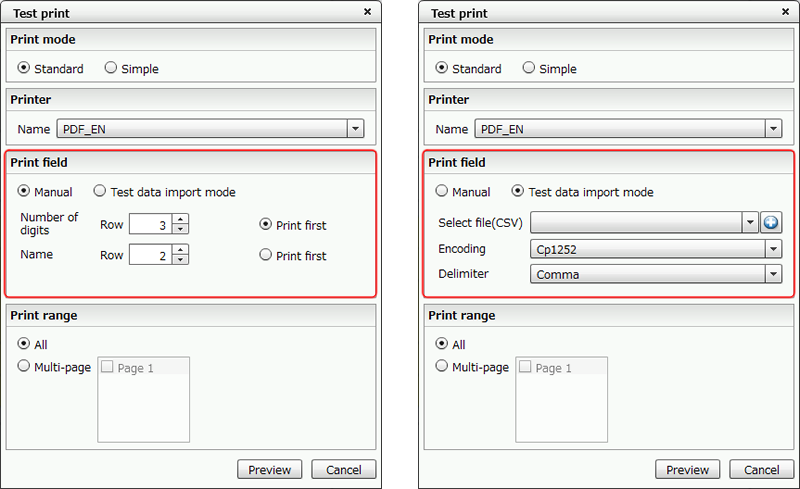
When "Manual" is clicked in the "Test print" dialog (L) and when "Test data import mode" is clicked (R)
Item
Description
Print mode
Select a mode for creating test data.
Standard
Enables print field settings.
Creates and prints test data according to the print field settings.
Simple
Prints test data for a single record.
Printer
Specify the output printer from the printers that were created with SVF Configuration Tool.
Caution
When SVF output engine Ver. 9.2 is installed and PDF option is available, PDF printer for the test print is automatically created.
To use another printer, you need to create and register it in SVF Configuration Tool before the test print.
Name
Select the output printer.
The printers registered in SVF Configuration Tool appear.
Print field
Specify how to create the test data to be printed.
Manual
Specify the number of rows of Number of digits and Name of the test data to be created.
Number of digits
This setting is for the detail records on the subform. The specified number of the detail records will be created when test printed. The fields in the detail records are displayed as "XXXX".
Name
This setting is for the detail records on the subform. The specified number of the detail records will be created when test printed. The fields in the detail records are displayed as <field_name>.
Print first
Set the display order of Number of digits and Name when displaying the preview. The checked item appears first.
Test data import mode
Imports test data to perform the test print. Supported file formats are comma-delimited or tab-delimited CSV files. Tab-delimited format is supported from Service Pack 2.
For details on CSV file formats, see "4-12-2 Format of CSV file used in test data import mode" in the next section.
Note that CSV files that specify functions enclosed in the control command "<start><end>" cannot be used as test data.
Select file(CSV)
Specify a CSV file.
To select a CSV file that has been uploaded to a certain location of the form definition, select a CSV file name from the list.
To select a CSV file that has not been uploaded, click the
 Add file(s) to the form definition button to upload the CSV file.
For details, see "4-13-3 Other files".
Encoding
Specify the encoding for the CSV file.
Delimiter (supported from Service Pack 2)
Specify the delimiter for the CSV file.
Print range
Specify the range of pages for the test print.
All
Prints all multi-pages.
Multi-page
Select the multi-pages to print.
Click the Preview button.
The result appears in the preview window.
You can check the processing details of the test print in the debug log. In the Debug settings tab on SVF Configuration Tool, you can set whether or not to output debug log, the directory of output destination, etc.
Reference
Test data import mode is executed in mode 4 of the VrSetForm function, even for forms for which the subform and records are not set.
Caution
To preview the result of a test print with Form Designer, the font used must be installed on the client machine.